
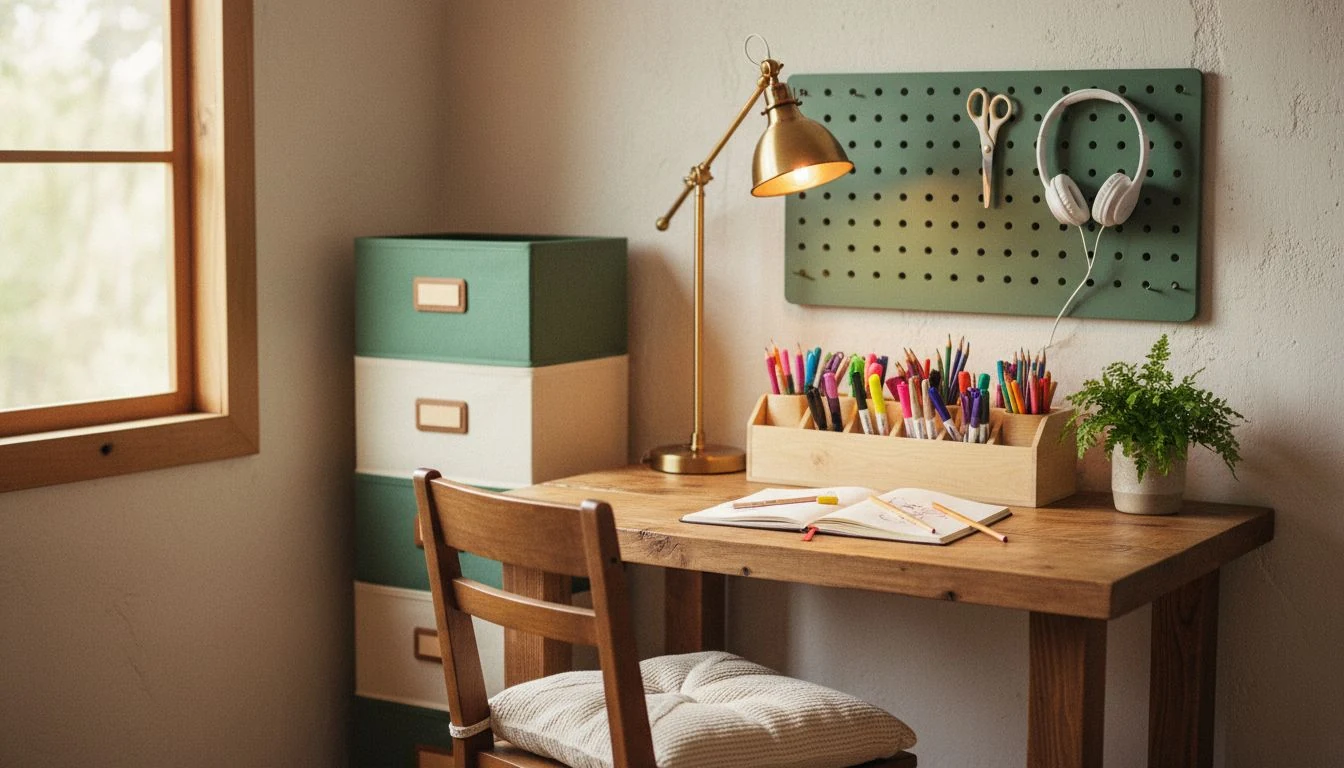
My kid did homework at the kitchen table for exactly one school year. By October that table was a landfill of half-finished worksheets, and every dinner started with me sweeping glue sticks into a basket. So one Saturday I built a DIY homework station in the corner of our dining room for about $79, and it fixed our weekday afternoons faster than any planner or app ever did. This is the whole thing: where I put it, what I bought, what I would skip, and what it really costs at three different budgets.
I’m Tessa. I’m not a contractor and I don’t have a craft room the size of a garage. I have a corner, a drill I bought used, and a stubborn belief that kids do better work when they have a spot that’s actually theirs. Here’s how to build one without spending a fortune or drilling forty holes into a wall you might have to patch later.
Why a DIY homework station beats the kitchen table
The kitchen table has one job during homework hour, and it’s fighting you. Someone needs it for dinner prep. The good pencils have vanished. The worksheet is under a placemat. My daughter would spend the first ten minutes just finding her stuff, and by then she was already done trying.
A dedicated DIY homework station solves the boring problem that quietly wrecks focus: setup friction. When the pencils, the paper, and the lamp live in one spot that never gets cleared for dinner, the kid sits down and starts. That’s the whole magic. It isn’t a Pinterest showpiece. It’s a place where the work happens without a treasure hunt first.
I also just wanted my table back. That counts too.
Where to put a homework station in a small house
You do not need a spare room. I’ve now built two of these, and neither had a dedicated office to work with. The trick is stealing a corner, not a whole room.
- A dining-room or living-room corner. This is what I used. A narrow desk against one wall, nothing that blocks a walkway.
- A closet nook. Pull the doors off a shallow closet, add a board across as a desk, and you have a “cloffice” that closes up. Renters, check your lease before you unhinge anything.
- The end of a hallway. A slim console-depth desk (about 16 inches) fits where you’d never expect it.
- A shared spot for two. One longer surface, two chairs. More on that below.
My one rule: put it where you can see it from the kitchen. Homework goes better when a grown-up is loosely nearby, not hovering, just there. Sticking the desk in a back bedroom sounds peaceful and mostly means the kid disappears and “does homework” with a tablet.
What I bought for my homework station (and the real cost)
Here’s every line of my build, receipts and all. I got lucky on the desk at a thrift store, so I’ve listed a from-scratch price too in case you don’t.
| Item | What I actually got | Cost |
|---|---|---|
| Desk surface | Thrifted student desk (a 4-ft pine board + 2 brackets works too) | $25 |
| Chair | Kitchen chair we already owned | $0 |
| Pegboard + hooks | Small pegboard from the hardware store, cut to fit | $14 |
| Supply caddy | Divided caddy for pencils, scissors, glue | $8 |
| Bins + labels | Three shoebox bins, one per subject, hand-labeled | $9 |
| Task lamp | Clip-on LED lamp (the eyes-and-focus upgrade) | $16 |
| Cork strip + tacks | For the week’s calendar and one reward chart | $7 |
| My total | ~$79 | |
Notice what’s not on there: no matching furniture set, no fancy chair, no label maker. The lamp is the one thing I’d never cut. A dim corner makes a kid slump and rub their eyes in twenty minutes, and I’d rather spend $16 than fight that every night.
Building the DIY homework station step by step
The whole build took me about two hours, and most of that was me second-guessing where to drill. If you’re using a thrifted desk instead of a board-and-brackets top, skip to step 3.
- Mount the desk surface (if you’re wall-mounting). Find the studs, mark a level line at about 28 to 30 inches high for a grade-schooler, and screw two sturdy shelf brackets into the studs. Set the board on top and secure it. If you’re not into studs, a cheap flat-pack desk skips this entirely.
- Anchor anything tall. This is the non-negotiable one. Any bookshelf or hutch near a kid’s desk gets strapped to the wall. Tip-overs are a real hazard, and the U.S. Consumer Product Safety Commission runs a whole Anchor It! furniture safety program because of it. A $6 anti-tip strap is the cheapest insurance in this build.
- Hang the pegboard. Mount it on the wall above the desk with the spacers so hooks can slide in behind it. This holds headphones, scissors, and the calculator that otherwise walks off.
- Set up the caddy and bins. Caddy front and center. One labeled bin per subject or per kid. Keep it stupidly simple. Over-organizing on day one is how these become a graveyard of empty containers.
- Add the lamp and the cork strip. Clip the lamp to the desk edge or a shelf. Tack up a cork strip for the week’s assignments and one small reward chart. Done.
That’s it. No sanding, no paint, no weekend lost. If you want a paint refresh on a thrifted desk, I go into low-effort finishes in my dollar-store DIY decor guide, but a scuffed desk works fine and kids don’t care.
Organizing supplies so the station stays usable
A homework station dies the second it becomes a dumping ground. I learned this the hard way with my first one, which turned into a mail pile by Thanksgiving. Three habits keep mine alive:
- One-touch reset. Ninety seconds at the end of homework: pencils in the caddy, papers in the bin, chair pushed in. We do it together while I’m nearby, and it stops the slow slide into chaos.
- A “launch” bin by the door, not on the desk. Finished, signed, ready-to-go work leaves the station so it doesn’t pile up. Backpacks live near the door, never on the desk.
- Refill on a schedule, not a panic. I keep a small overflow box of pencils and glue in a nearby closet and top up on Sundays. No more 9 p.m. runs for a poster board.
If you love a color-coded system, go for it. Just build the system after you see how your kid actually makes a mess, not before. I have a whole set of no-damage organizing tricks in my renter-friendly decor ideas if you can’t put a single hole in the wall.
Making a homework station work for two kids
Two kids, one budget, and they will absolutely fight over the good chair. I’ve done the shared version for a friend’s twins, and a couple of things matter. Give each kid their own bin and their own caddy, even if they share the surface, because “whose scissors are these” is a fight you can design out of existence. If the ages are far apart, a longer desk with a low divider (a cereal-box-height piece of foam board works) keeps the little one from swiping the big one’s stuff.
And if you can swing two small separate spots instead of one shared one, do it. It costs a bit more, but it heads off the daily turf war. A second thrifted desk in a different corner beats one perfect shared station that becomes a battleground at 4 p.m.
What a DIY homework station really costs (three budgets)
People ask me what this “should” cost, and the honest answer is: anywhere from nearly nothing to a few hundred dollars, depending on how much you repurpose versus buy new. Here’s the same station at three real budget tiers so you can pick your lane.
| Budget tier | What it looks like | Approx. 2026 cost |
|---|---|---|
| No-buy / repurpose | Thrifted or hand-me-down desk, a chair you own, shoebox bins, a lamp from another room | $0–25 |
| Thrift-flip (my build) | Thrifted desk or board-and-brackets, pegboard, caddy, labeled bins, clip lamp | $75–120 |
| New from scratch | Flat-pack desk, task chair, new organizers, LED desk lamp, cork board | $180–320 |
What blows a homework-station budget
- Buying a matching furniture set. The desk-plus-hutch-plus-chair combos marketed as “kids’ study sets” run $200 to $500 and do nothing a $25 thrifted desk and a wall strap can’t. The set is where the budget quietly triples.
- Over-buying organizers before you know the mess. It’s tempting to fill a cart with cute bins on day one. Wait two weeks, watch how the clutter actually forms, then buy the three containers you truly need. I’ve wasted $40 on drawer dividers that never got used.
- A fancy ergonomic chair for a growing kid. A $180 adjustable chair sounds responsible, but a growing kid outsizes it fast. A firm kitchen chair with a cushion for height does the job for years, and you’re not precious about it when they draw on it.
Want my one-page setup? I made a free printable homework-station checklist and supply list you can tape inside a cabinet, plus my project cost estimator to price out your build before you shop. Grab them and knock this out this weekend.
Frequently Asked Questions
How much does a DIY homework station cost?
Most people land between $75 and $120 if they thrift the desk and buy a few organizers, like my roughly $79 build. You can do it for under $25 by repurposing furniture you already own, or spend $180 to $320 buying everything new. Costs are estimates and vary by region and what you have on hand.
Where should I put a homework station in a small apartment?
Steal a corner, not a room. A narrow desk in a living-room or dining-room corner, a shallow closet turned into a “cloffice,” or the end of a hallway all work. Put it within eyeshot of where you cook so a grown-up is loosely nearby during homework time.
What should a homework station have?
Keep it to five things: a clear surface, a comfortable chair, a good task light, one caddy for daily supplies, and labeled bins for papers. A pegboard or cork strip for the week’s assignments helps. Skip the matching furniture set. The American Academy of Pediatrics recommends a consistent, quiet workspace without distractions, and that matters more than anything fancy.
A quick note: I’m Tessa, the fixer-upper behind The Handy Hearth, not a licensed contractor or child development pro. I share what’s worked in my own home and what I’ve spent doing it. All prices are 2026 estimates that shift by region, store, and what you already own. Check your lease before mounting anything if you rent.
Free DIY Project Cost Estimator
The spreadsheet I use to price out a project before I start, so a weekend job never blows the budget. Join the newsletter and I’ll send it over.
No spam, ever. Unsubscribe anytime. — Tessa
Keep reading — more on Budget Decor
Budget Backyard Makeover: How I Did Mine for Under $200 (Renter-Friendly)
My budget backyard makeover cost $186, not $5,000. Here's the renter-friendly weekend playbook for cozy outdoor…
Read article →
DIY Back-to-School Drop Zone: A Backpack & Homework Command Station
Build a DIY back-to-school drop zone in a weekend: hooks, cubbies, and a homework command station…
Read article →
Kids' Room Makeover on a Budget (A Back-to-School Refresh)
Three weeks before school started, my daughter announced that her room was “a baby room” and…
Read article →
The Weekend Front Door Refresh: 2026's Easiest Curb-Appeal Upgrade (Under $100)
A budget front door refresh for under $100: real 2026 paint, hardware, and house-number costs, plus…
Read article →