
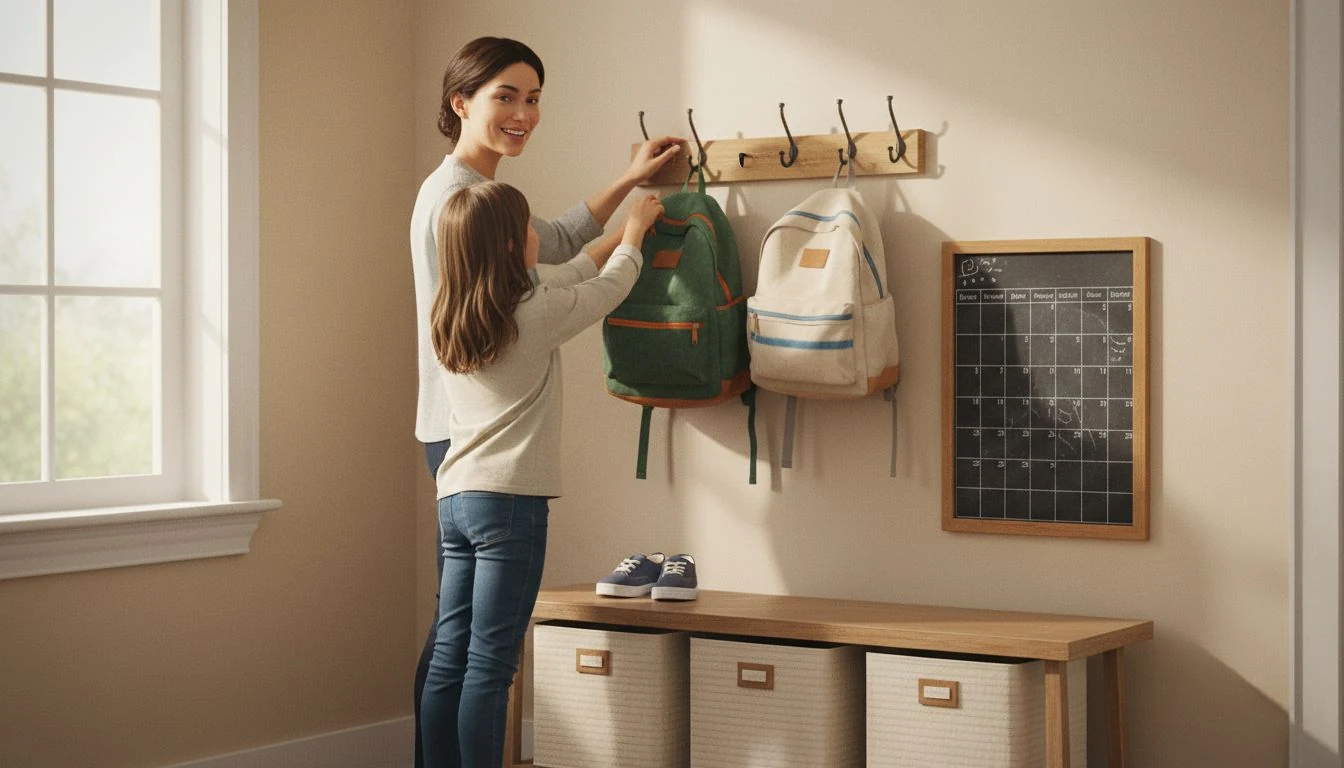
Every August my front hall turns into a crime scene. Two backpacks flung by the door, one shoe under the radiator, a permission slip I swear I never saw, and a kid yelling that he can’t find his water bottle while the bus wheezes at the corner. Last year I finally gave up one Saturday and a hard cap of about $120 and built a DIY back-to-school drop zone, a single spot by the door where every backpack, shoe, and stray paper has a home. Mornings got quieter almost overnight. This is exactly what I built, what I bought, what I skipped, and how you can do the same in a weekend without a single fancy tool.
I’m Tessa. I’m not a contractor and I didn’t hire one. I’m the mom who mounts a hook rail at 9 p.m. because I’m tired of tripping over a trombone case. A drop zone is my favorite beginner build for exactly that reason. It’s forgiving, it’s cheap, and it pays you back every single school morning for years. Here’s how I got there.
What a DIY back-to-school drop zone actually is
A drop zone is the landing pad your family already uses without meaning to. You know the pile. The difference is that a real drop zone gives that pile structure so it stops spreading across the whole house. At its simplest it’s three things: a place to hang the bag, a place to drop the shoes, and a place to catch the paper. Everything else is a bonus.
Why bother? Because back-to-school is not a small line in the budget anymore. The National Retail Federation’s 2026 data puts average spending at around $875 per child in grades K-12, and a lot of that is stuff that walks off if it doesn’t have a home. A $9 hook that saves one lost lunchbox a month more than pays for itself. That’s the whole pitch.
Where to put your drop zone (small entryways included)
The best spot is the door your kids actually use, not the pretty front door nobody touches. For most of us that’s the side door, the garage entry, or a stretch of wall in the mudroom. Mine is a three-foot slice of wall between the front door and the coat closet. That’s it. You do not need a mudroom to have a drop zone.
Measure the wall before you buy anything. I learned that the hard way when I brought home a bench that stuck four inches into the doorway swing. Give each kid a lane, even if a lane is just one hook and one cubby. Kids will use a system they can reach and understand, and they will ignore anything that requires them to open a drawer. Hooks beat drawers every time at this age.
What you’ll need to build a backpack and homework command station
Here’s my no-nonsense supply list. You can find every piece of it at a hardware store or online, and none of it needs a workshop.
- A hook rail or individual hooks. One sturdy hook per kid, mounted at their shoulder height, not yours. I paid $14 for a four-hook rail.
- A bench or a bin for shoes. A cheap shoe tray ($12) or a thrifted bench keeps footwear off the floor.
- A cubby or basket per kid for the stuff that isn’t a bag: hats, chargers, the reusable water bottle. Dollar-store bins work fine here.
- A paper catcher. A wall file, a clipboard, or a small chalkboard for the permission slips and the field-trip forms that otherwise vanish.
- Wall anchors, a level, and a drill. Drywall anchors rated for at least 20 pounds. A loaded backpack is heavier than you think.
That’s the core kit. If you want to see the whole thing costed out three ways, I put a full table near the bottom.
How I built my DIY back-to-school drop zone in one Saturday
The build itself is short. The measuring and the coffee are what take the morning.
First, I cleared and cleaned the wall, then taped a paper template of each hook where I wanted it and had my kids stand under it to check the height. A hook is useless if the bag drags on the floor or hangs above their reach. Second, I found the studs with a $10 stud finder and marked them. Wherever a hook landed on a stud, I screwed straight in. Wherever it didn’t, I used a rated drywall anchor. This is the step people skip, and it’s why so many hook rails end up on the floor by October.
Third, I leveled and mounted the hook rail, then set the shoe bench underneath and slid a labeled bin into each cubby. I used a label maker, but a strip of painter’s tape and a marker works just as well and costs nothing. Last, I hung the paper catcher at grown-up eye level, because that one’s for me, not them. Total working time was about two hours, plus the trip to the store. If you want to warm the whole nook up with a coat of paint first, my kids’ room makeover on a budget walks through the cheap-paint approach I use.
The homework command station part (the half everyone forgets)
A drop zone catches the morning. A command station catches the afternoon. When the bags come off the hooks at 3 p.m., the homework and the signed forms have to land somewhere, or they end up back in the bottom of the backpack until the teacher emails you.
Mine is small: a wall calendar, a shallow tray for papers that need a parent signature, and a charging shelf so the school tablet actually gets charged instead of dying overnight on the couch. If you have the wall for a real desk, a proper study nook is the upgrade, and I built one for cheap in my back-to-school homework station guide. But you don’t need a desk to run a command station. A clipboard and a $4 basket by the door will stop ninety percent of the “I forgot to tell you” surprises.
The trick that changed everything for us: one basket labeled “needs a grown-up.” Anything that needs my signature, my money, or my calendar goes in that basket the second it comes home. I check it while dinner cooks. No more 10 p.m. permission-slip panic.
Renter-friendly, no-drill drop zone options
Renting doesn’t get you out of the backpack pile, but it does rule out a wall full of screw holes. Good news: a drop zone works without a drill.
Use a freestanding coat rack or a slim bookshelf turned into cubbies instead of mounted hooks. Over-the-door hook racks hold backpacks with zero hardware. Heavy-duty adhesive hooks, the kind rated for a few pounds, handle lighter bags and jackets if you follow the weight limit and prep the wall with rubbing alcohol first. A shoe tray and a couple of bins finish it, and none of it leaves a mark. I’ve got a whole list of these tricks in my renter-friendly decor ideas post, and the bins themselves are the kind of thing you can grab from the dollar store without it looking cheap.
One honest caveat from experience: adhesive hooks and a fully loaded fourth-grade backpack are not friends. Weigh the bag. If it’s over about five pounds, that’s a job for a real anchor or a freestanding piece, not a sticker.
Anchor it: the five-minute safety pass
This is the part I will not let you skip. Anything tall in a drop zone, a bookshelf, a cubby tower, a bench with shelves, becomes a climbing wall to a small kid reaching for their own backpack. Furniture and TV tip-overs are a real hazard, and the Consumer Product Safety Commission’s Anchor It! program exists because kids get hurt every year when unsecured furniture falls on them.
The fix takes five minutes and a $10 anti-tip kit. Strap any freestanding shelf or cubby unit to a stud. Put the heaviest bins on the bottom, never the top. Keep the tempting stuff, the tablet, the treats, off high shelves so nobody has a reason to climb. I anchor before I load a single bin. It’s the cheapest insurance in the whole project.
What a DIY back-to-school drop zone costs (three budgets)
Here’s the honest range. What you spend on a DIY back-to-school drop zone depends entirely on whether you’re hanging a few hooks or building a full mudroom wall. These are 2026 estimates and they vary by region, store, and how much you thrift.
| Piece | No-drill / renter | Weekend build (mine) | Built-out wall |
|---|---|---|---|
| Hooks / rail | $15 adhesive or over-door | $14 four-hook rail | $40 rail + board |
| Shoe storage | $12 tray | $12 tray or thrifted bench | $60 cubby bench |
| Bins / baskets (per kid) | $3 dollar-store bins | $5 labeled bins | $12 matching baskets |
| Paper / command center | $4 clipboard | $10 wall file + calendar | $35 chalkboard + tray |
| Paint (optional) | $0 (skip) | $15 sample pot | $35 quart + supplies |
| Anchors + hardware | $0 | $18 anchors, level, kit | $25 |
| Rough total | $35 to $60 | $95 to $130 | $200 to $260 |
What blows a drop zone budget
- Buying a matching furniture set instead of building the wall. A pre-made mudroom locker can run $300 to $800 for one kid. A rail, a bench, and some bins do the same job for a fraction, and they scale as your kids grow.
- Skipping the stud finder and cheap anchors. A hook that rips out of the drywall takes a chunk of wall with it, and now you’re patching and repainting. The $10 in anchors is the whole point.
- Over-bin-ing it. It’s easy to buy a dozen cute baskets you don’t need. Start with one bin per kid plus the “needs a grown-up” basket, then add only what actually piles up.
Grab my free Project Cost Estimator. Before you buy a single hook, plug your wall size and the number of kids into my printable one-page estimator so you walk into the store with a real number instead of a cartful of guesses. It’s the same sheet I use to keep a $100 drop zone from quietly becoming a $300 one.
Frequently Asked Questions
How do I make a back-to-school drop zone in a small entryway?
You only need about three feet of wall. Mount one hook per kid at their shoulder height, add a slim shoe tray underneath, and hang a wall file or clipboard for papers. Go vertical instead of wide: stacked hooks and a tall narrow cubby use floor space you don’t have. A small drop zone works as well as a big one if every kid can reach their own hook.
How much does it cost to build a DIY drop zone?
A renter-friendly, no-drill version runs about $35 to $60. A mounted weekend build like mine lands around $95 to $130. A full built-out mudroom wall with a cubby bench and chalkboard runs $200 to $260. Thrifting the bench and using dollar-store bins is where most of the savings live.
What’s the difference between a drop zone and a homework station?
A drop zone handles the morning: bags, shoes, and papers heading out the door. A homework station handles the afternoon: a spot to do work, charge devices, and stash forms that need a signature. Many families combine them into one wall by the door, which is exactly what a backpack and homework command station is.
All prices here are 2026 estimates and vary by region, store, and how much you buy new versus secondhand. Tessa is a hands-on homeowner, not a licensed contractor; anchor any freestanding furniture and follow product weight limits, especially around young children.
Free DIY Project Cost Estimator
The spreadsheet I use to price out a project before I start, so a weekend job never blows the budget. Join the newsletter and I’ll send it over.
No spam, ever. Unsubscribe anytime. — Tessa
Keep reading — more on Budget Decor
Budget Backyard Makeover: How I Did Mine for Under $200 (Renter-Friendly)
My budget backyard makeover cost $186, not $5,000. Here's the renter-friendly weekend playbook for cozy outdoor…
Read article →
Kids' Room Makeover on a Budget (A Back-to-School Refresh)
Three weeks before school started, my daughter announced that her room was “a baby room” and…
Read article →
Back-to-School Homework Station: A DIY Study Nook on a Budget
The DIY homework station I built for about $79: where to put it, what to buy,…
Read article →
The Weekend Front Door Refresh: 2026's Easiest Curb-Appeal Upgrade (Under $100)
A budget front door refresh for under $100: real 2026 paint, hardware, and house-number costs, plus…
Read article →