
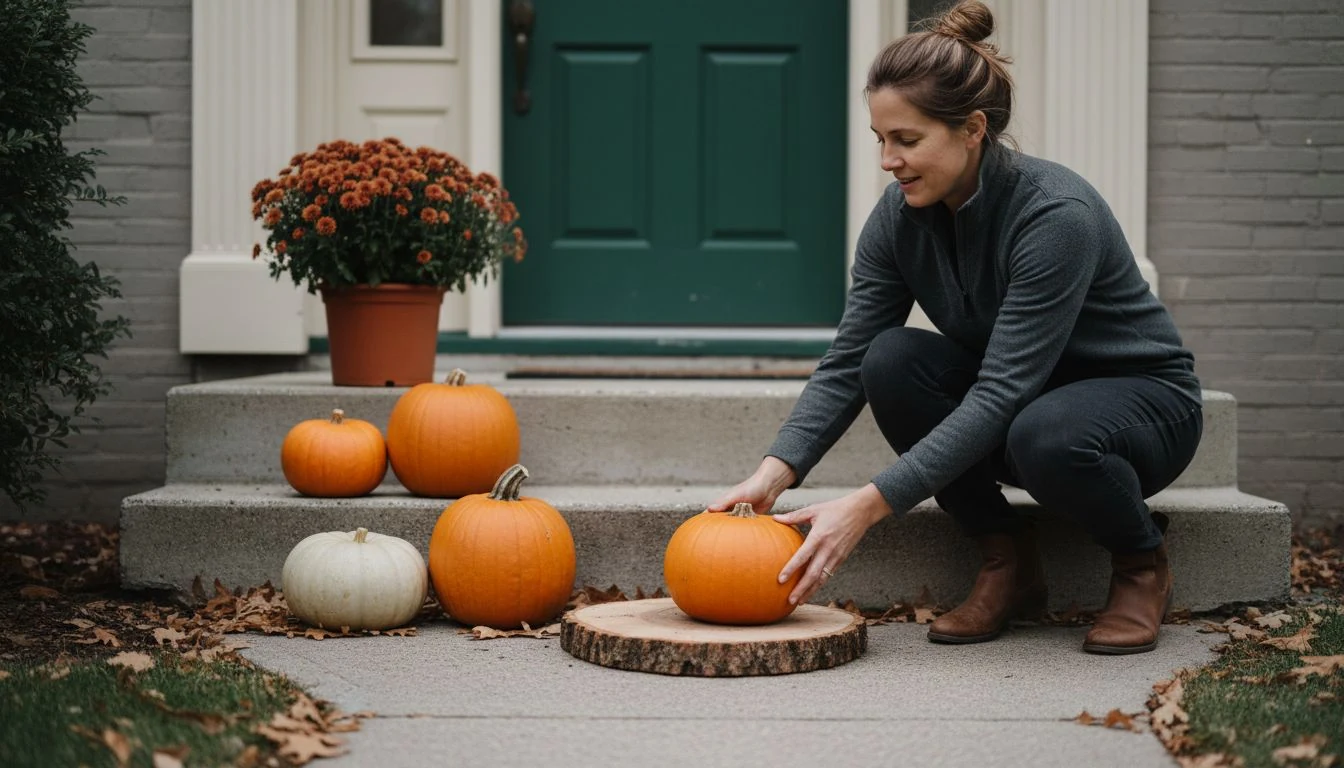
I bought my outdoor pumpkin decorations on the last Saturday of September two years ago. Six pumpkins, $38, hauled up the steps in two trips. By October 12 the biggest one had folded in on itself on the top step like a punctured basketball, and there was a wet orange ring on the concrete that took a scrub brush and most of a Saturday morning to lift.
The pumpkins were fine when I bought them. I killed them with the timing and the placement, and I had no idea that was what I’d done. This is the post I wanted back then. I already wrote the budget fall porch version of how to style the whole entry, so this one goes after the narrower and more irritating question sitting underneath it: which pumpkins make it eight weeks outside, what you can do to the ones that wouldn’t have, and where to set them so the good ones last and the bad ones don’t stain anything you’ll have to scrub.
I’m Tessa. I rent, my front steps face west and cook every afternoon from about two o’clock, and I’ve been keeping a note on my phone about this for four autumns because I got tired of guessing.
What my outdoor pumpkin decorations cost, and how long each one lasted
I kept the log because I’ve never found this written down anywhere. Same steps, same west exposure, same me. The only variable was what I put out and what I did to it first.
| What I put out | What I paid | Days it still looked good | What failed first |
|---|---|---|---|
| Uncarved field pumpkin, set on bare concrete | $7 | 16 | Flat wet spot on the bottom, then collapse |
| Uncarved field pumpkin, on a cedar round | $7 plus scrap wood | 52 | Skin dulled, never actually rotted |
| Carved jack-o-lantern, untreated, real candle | $9 | 4 | Cut edges curled and furred within two days |
| Carved jack-o-lantern, bleach wash plus jelly, LED | $9 plus $3 jelly | 11 | Lid sagged, face still readable |
| White Casper pumpkins, uncarved, on the steps | $12 for two | 41 | Yellowed rather than rotted |
| Mini pumpkins in a planter, uncarved | $6 for five | 29 | Squirrels, not decay |
| Faux carvable pumpkin, third season out | $14 once | Still going | Sun fade on the west-facing side |
The 16 days and the 52 came from the same kind of pumpkin, bought the same week at the same store. One sat on bare concrete and one sat on a scrap of cedar. That single difference is most of this post.
Buy the pumpkin that was already going to last
Half of this is decided in the parking lot before you get home, and it took me two seasons to believe that.
The stem is the tell. The University of Illinois Extension puts it plainly in its guide to picking pumpkins: the ones without a stem don’t last as long as the ones that have one, and you want to pass on anything with soft spots, mold, wrinkles, holes or open cuts, because those spots are where it will start. A pumpkin with a dry, hard, intact stem has a sealed lid on it. One that snapped off in the bin has an open wound on top and it is already losing.
Never carry a pumpkin by the stem, either. That’s the mistake I made for years without thinking about it. You’re hanging fifteen pounds off the one part that’s keeping water in, and even when it doesn’t break, you’ve loosened it. Two hands under the bottom, every time. My back hates it and my October likes it.
Press the bottom with your thumb before it goes in the cart. If it gives even slightly, put it back. That soft patch is the flat wet spot from row one of my table, four weeks early and already started.
The treatment that actually works, and the ones that didn’t
Only relevant if you cut into it. An uncarved pumpkin doesn’t need anything done to it. It needs a dry surface and airflow, and that’s the whole job.
Once you cut, you’ve opened the thing up to every mold spore in the yard. Illinois Extension’s recommendation is to wash the cut surfaces with a 20 percent bleach solution to slow the rot, then coat the cuts with petroleum jelly so they hold their moisture. That’s roughly one part bleach to four parts water, and I keep it in a spray bottle with a rag. It bought me a full week over doing nothing, which you can see in rows three and four above.
The jelly feels ridiculous. Do it anyway. Every cut edge, the lid rim, the inside of the face, smeared on with a finger until it looks greasy. Cut edges fail first because that’s where the water walks out, and the jelly is what stops the curling that makes a two-day-old jack-o-lantern look furry.
Three things I’ve tried that I would skip now:
- The overnight bleach bath. Submerging the whole pumpkin in a bucket. It worked a little, and it cost me a bathtub scrub, twenty minutes of hauling, and a garage that smelled like a pool for two days. The wipe-down gets you most of it for none of the trouble.
- Hairspray on the cut edges. This one is all over the internet. Mine curled on the same schedule as the untreated one, and I had a sticky pumpkin that collected pollen.
- A real candle. The reason here is mechanical. Illinois Extension says a candle speeds up the deterioration, and once you’ve watched it happen you understand why: you are gently cooking the inside of a squash for three hours a night. Use a battery light. Cheap ones run about $2 and they let you leave the face lit when you’re not home, which is the reason you carved it.
Carving is the decision that costs you two weeks
Carving turns an eight-week decoration into a ten-day one. That’s the trade, and it’s a fine trade to make, as long as you make it on purpose instead of on the first cool Sunday in September because you felt like it.
My rule now is that the jack-o-lantern gets carved the weekend before Halloween and not one day sooner. Everything I want up for the whole season stays whole. Uncarved pumpkins carry a season the way a wreath does, and if you want the doorway to feel finished in early October, that’s what a wreath that survives the front door is for. It doesn’t have a clock running on it.
If you have kids who want to carve in early October, buy them a cheap dedicated pumpkin for that and let it die on schedule. Keep it away from the ones you’re counting on. Decay spreads on contact, and one collapsing pumpkin leaning against a good one will take it down with it.
Get outdoor pumpkin decorations off the ground, always
Free, and it more than tripled my numbers.
A pumpkin sitting flat on concrete, brick or a wood deck has one spot that never dries. Dew collects there overnight, the sun never reaches it, and the skin goes soft from underneath while the top still looks perfect. That’s why row one lasted 16 days and row two lasted 52 for the identical pumpkin.
Illinois Extension makes the same point for storing them: keep them off the floor and use a porous surface like cardboard, an old rug, straw or wood if they have to go down low. Outside, I use a cedar shingle, a slice of log, a terracotta saucer flipped upside down, or a doubled square of jute doormat. All of it either free or under $4, and none of it visible once the pumpkin is on top.
Air on all sides matters too. Iowa State University Extension’s guidance on how to store pumpkins is to keep them in a single layer where they aren’t touching one another, at 50 to 55 degrees, and to pull any that start to go soft right away. That last part is the one people skip. One bad pumpkin in a cluster is not a cosmetic problem, it’s a contagious one.
That storage range is also your buying strategy. If the good pumpkins show up at the farm stand in mid September and you want the pick of them, buy then and park them in the garage in a single layer. Bring them out in October looking like you just bought them.
Five spots for outdoor pumpkin decorations that aren’t the porch
The porch gets crowded and the rest of the property gets ignored. These are the five that have earned their place at my house, and four of them are spots I walked past for years without seeing.
- The walkway edge. Three pumpkins in descending size along one side of the path, spaced further apart than feels right. Two feet, not eight inches. It reads as intentional from the street instead of as clutter, and it’s the only spot that changes how the house looks from a moving car.
- The mailbox post. One mini pumpkin on a cedar round at the base, plus dried grass tucked behind the post. This is the highest-visibility square foot you own and mine sat empty for three years.
- Inside the planters you already have. When the summer annuals go leggy in September, pull them and set a pumpkin down into the pot on top of the soil. Free, it drains fine, and it saves you buying mums. This is my favorite piece of decor that doesn’t look cheap because the expensive-looking pot was already there.
- Stair treads, one per step, alternating sides. Only works if your steps are wide enough that nobody has to step around them in the dark. Mine are 48 inches, and I still keep them tight to the rail.
- The fence line or gate post. A pumpkin on the flat cap of a gate post is the single easiest thing on this list, takes eight seconds, and it’s the only one of the five that survives being seen from both sides.
All five are renter-safe. Nothing is drilled, glued or anchored, which is the same rule I hold everything to in my no-drilling decor ideas. Everything comes up in one armload on November 1.
When faux earns its money, and when it looks like it
I resisted these for a long time and I was wrong, but only in specific spots.
Faux wins where the pumpkin is small, high, or far from the eye. Mini pumpkins in a planter, anything on a gate post, anything above waist height. Nobody is inspecting the texture of a four-inch pumpkin from the sidewalk, and a $14 carvable one that’s now in its third October has cost me under $5 a season while every real mini I bought lasted a month at best.
Faux loses at the front of the house at eye level, in a large size, in direct sun. The sheen gives it away at ten feet, and the west-facing side of mine has faded to a color that isn’t quite orange anymore. I keep the real ones where people walk past them and the faux ones where they don’t. Same logic I use indoors on a fall mantel: real where it’s touched, faux where it’s only seen.
Rain, heat, and the squirrel problem
Rain alone doesn’t ruin a pumpkin. Standing water does. If yours sits in a puddle after a storm, that’s the flat spot forming, and the cedar round fixes it. Wind is a non-issue for anything over about four pounds, and the minis just need to sit down inside something.
Heat is what actually shortens the season in the south and in any west-facing spot. Above roughly 80 degrees, the clock speeds up, and a carved one in that sun will not give you a week. If you’re decorating in early October in a warm state, keep the carved pumpkin in shade and let the uncarved ones take the sun.
And the squirrels. Row six of my table, 29 days, gone to teeth and not to rot. Two things helped and neither is a fix: minis inside a planter with sides get bothered less than minis sitting loose on a step, and a squirrel that gets one easy win will come back for the rest. Cut surfaces are what they’re after, which is one more argument for carving late.
What blows the pumpkin budget
- Buying in September and carving the same weekend. This is the $38 mistake I opened with. You pay for eight weeks of decoration and you get ten days, then you buy a second round in late October at peak prices to have something for Halloween.
- Replacing the ones that died from the bottom. A soft base is a placement failure, not a bad pumpkin. Three seasons of buying two extra pumpkins a year to replace collapsed ones ran me about $40, and a cedar shingle out of the scrap pile would have prevented all of it.
- Real minis, every single year. Five for $6 sounds like nothing until you’ve bought them four autumns running. They’re the shortest-lived thing on the porch and the least inspected, which makes them the one place faux pays for itself fastest.
Grab my free Project Cost Estimator. Write down what you’re planning to spend on pumpkins, mums, and the rest of the entry before you get to the farm stand, so you see the running total while you can still put something back. It’s the one-page sheet that keeps a $20 idea from turning into a $60 cart somewhere between the gourd bin and the register.
Frequently Asked Questions
How long do outdoor pumpkin decorations last?
An uncarved pumpkin lasts one to three months outside if it stays dry underneath and out of standing water, and mine have gone 41 and 52 days without any special treatment beyond a scrap of wood to sit on. A carved one is a different object: figure a few days untreated, or about a week and a half with a bleach wipe-down, petroleum jelly on the cuts and a battery light instead of a flame. Heat above the low 80s shortens all of those numbers, and a hard freeze ends them in a single night.
Should I use real or faux pumpkins outside?
Both, in different places. Real earns its keep at eye level and up close where the texture and the matte skin read as genuine, and an uncarved real one costs about $7 and lasts most of the season anyway. Faux earns its keep on anything small, high, or far from the walkway, especially minis, which are the shortest-lived and least-inspected pumpkins you’ll buy. A $14 faux one in its third year has cost under $5 a season. Just keep faux out of harsh direct sun, because the west-facing side fades.
What is the best way to keep a carved pumpkin from rotting?
Carve it late, first of all. Nothing you do afterward buys back the two weeks you lose by carving in early October. Then wash every cut surface with a 20 percent bleach solution, coat the cuts and the lid rim with petroleum jelly, and light it with a battery LED rather than a candle, since the heat from a flame cooks the flesh from the inside. Keep it off bare concrete, out of afternoon sun, and bring it into the garage overnight if a hard frost is coming.
All prices here are 2026 estimates from my own projects and local stores, and the day counts come from my own tracking on west-facing steps in a humid climate. Both will vary with your region, sun exposure, humidity and first frost, so treat them as a starting point and not a guarantee. Tessa is a hands-on renter and DIYer, not a licensed contractor or a horticulturist. Keep open flame away from dried materials, use only outdoor-rated cords for any lighted display, and don’t eat a pumpkin that has been sitting out as decor.
Free DIY Project Cost Estimator
The spreadsheet I use to price out a project before I start, so a weekend job never blows the budget. Join the newsletter and I’ll send it over.
No spam, ever. Unsubscribe anytime. — Tessa
Keep reading — more on Holiday & Seasonal DIY
How to Hang Christmas Lights Outside Without Nails (or Eleven Ladder Trips)
My first year figuring out how to hang Christmas lights outside, I went up the ladder…
Read article →
DIY Fall Wreath: Three Versions Under $25 (That Survive the Front Door)
My three DIY fall wreath builds, all under $25: the real receipts, which base survives rain…
Read article →
Fall Porch Decor on a Budget (The Weekend Version, No Pumpkin Overload)
The first weekend of September I hauled a bale of straw up my front steps, dropped…
Read article →
Last-Minute 4th of July Decor on a Budget (Easy DIY Ideas)
Last-minute 4th of July decor on a budget: a three-zone plan, dollar-store buys, and real costs…
Read article →