
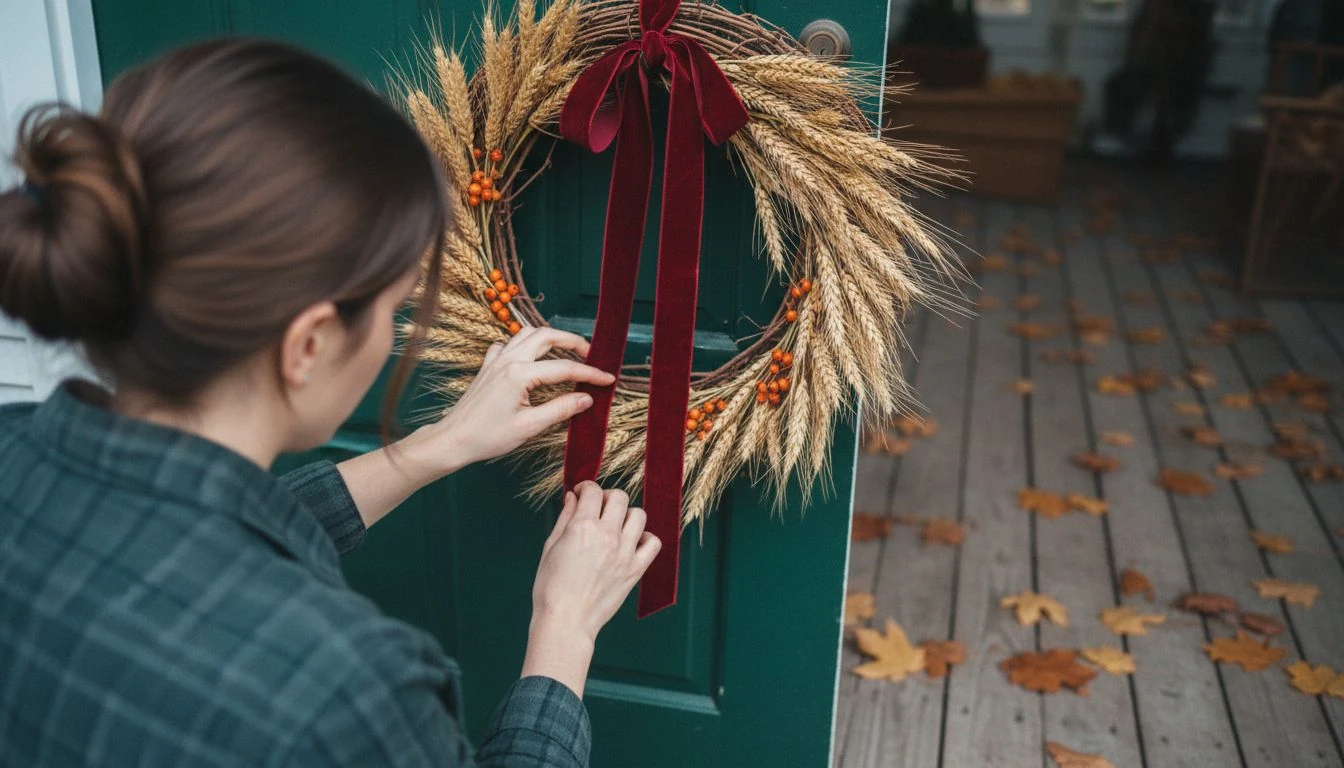
My first diy fall wreath cost me $31 and lasted nine days. I bought a foam ring, a bag of silk maple leaves that felt like a shower curtain, and a glue gun, and I sat on the living room floor gluing leaves in a spiral like I was being graded on it. It looked decent for about a week. Then a warm September afternoon hit the door, the hot glue softened, and half the leaves slid down into a sad pile at the bottom of the ring. The wind took it off the hook twice.
I’ve spent the four autumns since figuring out what holds. Three wreaths, all of them under $25, all of them still in a bin in my hall closet. I’m Tessa, I rent, and my front door faces west, which means it gets baked every afternoon from about two o’clock on. That door has destroyed enough decorations to teach me which parts of this project are worth money and which are worth nothing.
What my three DIY fall wreath builds actually cost
I’m listing every piece, including the things I already owned, because I find it infuriating when a post promises “under $20” and then assumes you have a glue gun, floral wire, and forty dollars of stems sitting in a craft drawer.
- Grapevine build: grapevine base $6, dried wheat bundle $4, two stems of faux orange berries $3. Total $13.
- Wood hoop build: 12-inch wood hoop $5, faux eucalyptus garland $8 (clearance, last October), velvet ribbon $4, floral wire $3. Total $20.
- Foraged build: wire wreath frame $4, magnolia and oak branches from the yard $0, jute twine $2, a bottle of glycerin from the pharmacy $5. Total $11.
Add a glue gun if you don’t own one and that’s another $8 at any big-box craft store. My honest advice is to skip it. Only one of these three builds uses glue at all, and it’s the one I’d rank last.
Start with the base, because that’s the part that fails
Every tutorial I’ve read starts with the stems. The base is what decides whether your wreath survives October, so pick it first and let the pretty part follow.
Foam rings are what I used the first time and I won’t buy another. Everything has to be glued on, and glue plus a sunny door is a countdown. Straw rings hold a wire pick well and cost about $5, but they mold if they sit in the rain, same as the straw bale that stained my concrete the year I did my fall porch decor the lazy way. Grapevine is the workhorse. It’s about $6, you can shove stems straight into the twists with no glue and no wire, and it looks like something on its own even when it’s bare.
Wire frames are the cheapest at around $4 and they’re built for bundling greenery on with twine, which is the technique for anything foraged. Wood hoops are the modern-looking option, and worth understanding before you buy one: a hoop is a frame. Nothing sticks to it, so you’re wiring a partial arrangement onto one arc, which is a different project than filling a ring.
Version one: grapevine and dried wheat, about $13
This is the one I’d make if you’re making exactly one. It took me eighteen minutes, most of which was cutting wheat stalks to length.
Take the grapevine ring and find the loosest section of twists, usually toward the bottom left. Cut your wheat into six-inch pieces and push the cut ends straight into the vine, all fanning the same direction. Don’t circle the whole ring. A cluster covering roughly a third of it looks intentional; a full ring of wheat looks like a hat. Then tuck two berry stems in among the wheat so a few berries sit slightly proud of the surface, and bend one longer piece back around the vine to lock everything in.
No glue. Nothing to fail in the heat. When I got bored of it in November I pulled the wheat out in thirty seconds and pushed in pine and eucalyptus instead, and the same $6 base carried me to Christmas.
Version two: the wood hoop with eucalyptus and velvet, about $20
This is the one people ask about. It photographs well and it’s the fussiest to build, which is a fair trade if you like the fussing.
Lay the hoop flat. Cut your faux garland into three pieces of unequal length, five inches, eight inches, twelve inches, and wire each one to the lower left arc of the hoop with the stems overlapping and pointing the same way. Unequal lengths are the whole trick. Three matching sprigs read as fake; staggered ones read as a plant. Wrap the wire tight, then hide it under the leaves and pinch the foliage back open with your fingers, because everything gets flattened in the packaging.
Tie the velvet ribbon at the top of the hoop and use it as the hanger. My first attempt used a wide satin ribbon instead, and satin in rain goes limp, water-stained, and eventually pink. Velvet or a cotton twill tape hold their color far better. If your door is sheltered you can also finish it with a small bow at the base of the greenery, but on an exposed door a bow is just a thing to get shredded.
Version three: the $11 foraged wreath, and the vine to leave alone
The cheapest one is the yard. Magnolia, oak, eucalyptus if you’re lucky enough to have it, seeded eucalyptus from a grocery bouquet, even bare curly branches.
Cut small branches about eight inches long and bundle three or four together with twine at the stem end. Lay the first bundle on the wire frame and wrap the twine through the frame twice. Lay the next bundle so its leaves cover the stems of the first, and keep going in one direction around the whole frame. It’s shingling. The last bundle tucks under the first one’s leaves. This is the oldest technique in the book and it holds up in wind better than anything glued.
Fresh leaves will curl and go brittle in about a week. To keep them supple, stand the cut stems in a jar with one part glycerin to two parts warm water for four or five days before you build, until the leaves feel leathery. Magnolia takes to this best. It’s a slow step, so start it the weekend before you plan to build.
One thing to know before you cut vines off a fence for a rustic base: bittersweet, the orange-berried vine sold in craft bundles every autumn, is usually Oriental bittersweet, which was introduced to the U.S. as an ornamental and is now an invasive across the Northeast and Midwest, where it smothers plants and pulls down trees with its weight. The berries are how it travels. If you use it, bag it in the trash when the season ends rather than tossing it into the yard waste or the woods behind the house.
How to hang a DIY fall wreath without wrecking the door
This is the part I care about most as a renter, and the part the tutorials skip.
The default is an over-the-door hook, and it has two problems. The first is that the hook rides on the top edge of the door where the paint is, and it will leave two shiny scuff marks. Slide a folded strip of felt under it. If the paint on that door is already tired, honestly, a weekend front door refresh does more for the entry than any wreath you hang on it. The second is clearance. If you have a storm door, most over-the-door hooks are too thick for the gap and the storm door will bump the wreath each time it closes. Measure that gap before you buy anything. Mine is just under two inches, which rules out about half the hooks on the shelf.
Two better options. If your exterior door is steel, and most are, a magnetic wreath hanger holds a light wreath, touches no paint, and slides anywhere you want it. Test it with a fridge magnet first; if the magnet falls off, your door is fiberglass or wood and this won’t work. Otherwise, run a length of ribbon over the top of the door and secure the tail to the inside face of the door near the top with an adhesive hook, where nobody sees it and nothing is drilled. That’s the same no-damage thinking behind my renter-friendly decor ideas, and it’s saved me a security deposit more than once.
If you’re hanging a lighted wreath, run it off outdoor-rated cords on a GFCI outlet and don’t chain adapters together on the porch. The Electrical Safety Foundation International has the short version of the outdoor decoration rules, and it’s worth the two minutes.
Which DIY fall wreath survives sun, rain, and a slamming door
My west-facing door is a torture test, so I’ve watched a lot of materials die out there. The pattern is consistent.
Things that hold: grapevine, wood hoops, wire frames, magnolia and oak leaves preserved with glycerin, dried wheat under an overhang, cotton and velvet ribbon, and faux greenery that says outdoor or UV-resistant on the tag. Things that don’t: anything paper or felt, raffia, cheap silk leaves in direct sun, which fade to a strange grey-pink in about six weeks, dried hydrangea in the rain, and anything attached with hot glue on a door that gets afternoon sun.
Two habits do more than material choice, though. Hang the wreath so it sits below the storm door’s swing rather than in it, and bring it inside for a real storm. Mine lives on a nail in the hall closet from November to September, uncrushed, and that’s why a $13 wreath is on its fourth autumn. I hang it the first week of September, which is earlier than I put anything living out, and if you want the inside of the house to match, my DIY fall mantel decor runs on the same three-color rule.
What three fall wreaths cost, how long they take, and what lasts
I built all three of these over two weekends and kept the receipts. Costs are 2026 estimates and they move with your region and with whether you shop clearance or full price in October.
| Build | Materials (2026 est.) | Build time | Skill needed | Seasons it lasts |
|---|---|---|---|---|
| Grapevine + dried wheat | $11 to $18 | 15 to 25 min | None, no glue | Base 4+, wheat 1 to 2 |
| Wood hoop + faux greenery | $18 to $28 | 35 to 50 min | Wiring, some patience | 3+ if stored flat |
| Wire frame + foraged leaves | $8 to $14 | 45 min, plus 4 days to preserve | Bundling and twine | 1 to 2, frame reuses forever |
| Foam ring + hot glue (skip it) | $20 to $35 | 60 min+ | Gluing, lots of it | Under 1, glue fails in heat |
| Store-bought fall wreath | $35 to $90 | 0 | None | 2 to 4, varies wildly |
What blows a fall wreath budget
- Buying stems by the single pick. Those $4 individual faux stems are how a $13 wreath becomes a $38 one. A whole garland runs $8 to $12 and cuts into six or seven usable pieces, which is the same material for a third of the price.
- Shopping in the seasonal aisle in September. Autumn stems are full price the week everyone wants them and half off around the third week of October. Buy the durable pieces, the hoops, ribbon, and faux greenery, on clearance for next year and buy only the living or dried things in season.
- Replacing a wreath you could have re-stuffed. This is the one that got me. A grapevine base is a permanent object. When the wheat looks tired, pull it and push in pine, and you have bought one base for four autumns instead of four wreaths.
Grab my free Project Cost Estimator. Put your wreath materials into my one-page printable estimator before you walk into the craft store, so you watch the running total climb while you can still put something back. It’s the sheet that keeps a $13 wreath from turning into a $40 one somewhere between the ribbon wall and the register.
Frequently Asked Questions
How much does a DIY fall wreath cost to make?
Between $8 and $25 in materials, depending on the base and whether you forage any of the greenery. My three came to $13, $20, and $11. The second year drops to nearly nothing, because the base, ribbon, and faux greenery come back out of the bin and you’re only replacing the dried or living pieces. A comparable store-bought wreath runs $35 to $90.
What is the best base for a DIY fall wreath?
Grapevine, for most people. Stems push straight into the twists with no glue or wire, it looks finished even when it’s sparse, and it survives weather for years. Use a wire frame if you’re bundling foraged branches with twine, and a wood hoop if you want the modern asymmetric look. Skip foam rings for any outdoor wreath, since everything has to be hot-glued and glue lets go in the heat.
Will a fall wreath survive rain on my front door?
The base and the ribbon will if you choose them right; the decorations are what decide it. Grapevine, wire, wood, preserved magnolia, and outdoor-rated faux greenery all handle a wet week fine. Paper, felt, raffia, dried hydrangea, and anything hot-glued do not. If your door has no overhang, expect to bring the wreath inside for real storms, and hang it clear of the storm door swing so it isn’t getting hit every time someone comes in.
All prices here are 2026 estimates from my own projects and local stores; they vary by region, season, and whether you shop clearance or full price, so treat them as a starting point and not a quote. Tessa is a hands-on renter and DIYer, not a licensed contractor. Follow the weight limit printed on any adhesive hook, keep open flame away from dried materials, and use only outdoor-rated cords for lighted wreaths.
Free DIY Project Cost Estimator
The spreadsheet I use to price out a project before I start, so a weekend job never blows the budget. Join the newsletter and I’ll send it over.
No spam, ever. Unsubscribe anytime. — Tessa
Keep reading — more on Holiday & Seasonal DIY
Outdoor Pumpkin Decorations That Don't Rot in Two Weeks
I bought my outdoor pumpkin decorations on the last Saturday of September two years ago. Six…
Read article →
Fall Porch Decor on a Budget (The Weekend Version, No Pumpkin Overload)
The first weekend of September I hauled a bale of straw up my front steps, dropped…
Read article →
Last-Minute 4th of July Decor on a Budget (Easy DIY Ideas)
Last-minute 4th of July decor on a budget: a three-zone plan, dollar-store buys, and real costs…
Read article →
Prime Day Tool Deals 2026: Worth It vs. Skip in October
Are Prime Day tool deals worth it in 2026? A handywoman's honest worth-it-vs-skip list, the 90-second…
Read article →