New here? Start with what home renovations really cost.
I stood in my kitchen one Saturday morning holding an orbital sander, looked at 28 cabinet doors, and thought, absolutely not. So I figured out how to paint kitchen cabinets without sanding them down to bare wood, and they’ve held up beautifully for two years. No dust storm, no aching arms, no respirator. Just a smarter prep step that does the same job.
If you’ve been putting off your cabinets because everyone online says you “have to sand,” I’m here to tell you that’s not quite true. You do have to prep, and you can’t skip that part. But the prep that actually matters is cleaning and dulling the surface so paint can grip, and there’s a way to do that without turning your kitchen into a wood-dust cloud. Here’s the exact step-by-step I used, the full materials list with what I paid, how long each part takes, and the mistakes that’ll wreck your finish if nobody warns you.
Wait, can you really skip sanding?
Mostly, yes, and here’s the honest nuance. The reason people sand is to do two things: knock off the slick factory sheen so paint can bond, and smooth out any roughness. You can replace the first job, the important one, with a liquid called a deglosser or a bonding primer that chemically prepares the surface. What you’re skipping is the heavy power-sanding, not the prep itself.
A quick scuff with a fine sanding sponge by hand is still smart on glossy spots, but that’s a two-minute, no-dust step, not an afternoon with a power sander. So when I say “without sanding,” I mean without the dusty, exhausting part. The grip step still happens, just in a way that doesn’t coat your whole house in fine powder.
One real safety note before you start. If your home was built before 1978, those old paint layers could contain lead, and you do not want to sand or scrape them. This no-sand method is actually the safer route for older homes precisely because it avoids dust. The EPA Lead Renovation, Repair and Painting Program explains why disturbing old paint is risky, and if you have any doubt, test for lead before you touch a thing.
What you’ll need (and what it costs)
Here’s everything I used on a 28-door kitchen, brush-and-roll, no sprayer. Your count may differ, but this is the realistic shopping list. The prices are 2026 ballparks.
| Material | What it does | Cost |
|---|---|---|
| Liquid deglosser (or TSP substitute) | Cleans grease + dulls the sheen so paint grips, no sanding | $12 – $18 |
| Bonding primer (1 gallon) | Sticks to slick surfaces and blocks the old color | $40 – $55 |
| Cabinet enamel paint (2 gallons) | The durable, washable topcoat made for cabinets | $80 – $110 |
| Foam mini-rollers + good angled brush | Smooth, low-texture finish without spray gear | $25 – $40 |
| Fine sanding sponge (220 grit) | Quick hand scuff on glossy spots, almost no dust | $6 – $10 |
| Painter’s tape + drop cloths + labels | Clean edges and keeping track of which door goes where | $20 – $30 |
| Total | $183 – $263 |
Call it around $220 all in, which is a rounding error compared to the pro quotes I got. If you want the full breakdown of DIY versus hiring out, I dug into every number in my cost to paint kitchen cabinets guide. Spoiler: doing it yourself saved me about $2,500.
How long the whole thing takes
Plan for two weekends, mostly because of dry time, not work time. The actual hands-on hours are fewer than you’d think. Here’s how mine broke down.
- Day 1 (3 hours): Remove doors, label everything, clean and degloss every surface. The cleaning is the most important hour of the whole project.
- Day 2 (4 hours): Prime all doors, fronts and frames. Let dry overnight.
- Day 3 (3 hours): First coat of enamel. Dry overnight.
- Day 4 (3 hours): Second coat, then let everything cure before rehanging.
The real test of patience is the curing. Paint feels dry in hours but isn’t fully hardened for days. Rush it and you’ll peel paint off the first time a door sticks. More on that in the mistakes section, because it’s the one that bites everyone.
Step by step: paint kitchen cabinets without sanding
This is the exact order I’d do it again. Don’t skip steps, especially the cleaning, because that’s where no-sand jobs live or die.
Step 1: Remove and label every door and drawer
Unscrew the doors and drawer fronts. Here’s the trick that saved my sanity: put a strip of painter’s tape inside each cabinet opening and on the matching door, and number them. Cabinet doors are not interchangeable, and hinges settle into their own spots. Toss the screws and hinges into labeled bags. Twenty minutes of labeling now saves an hour of swearing at reinstall.
Step 2: Clean like you mean it
Kitchen cabinets are coated in invisible cooking grease, especially around the stove and the handles. Paint will not stick to grease, full stop. Wipe everything down with a degreaser or a TSP substitute, then wipe again with clean water and let it dry. If your rag comes up grimy, keep going. This is the single most important step in the entire no-sand method.
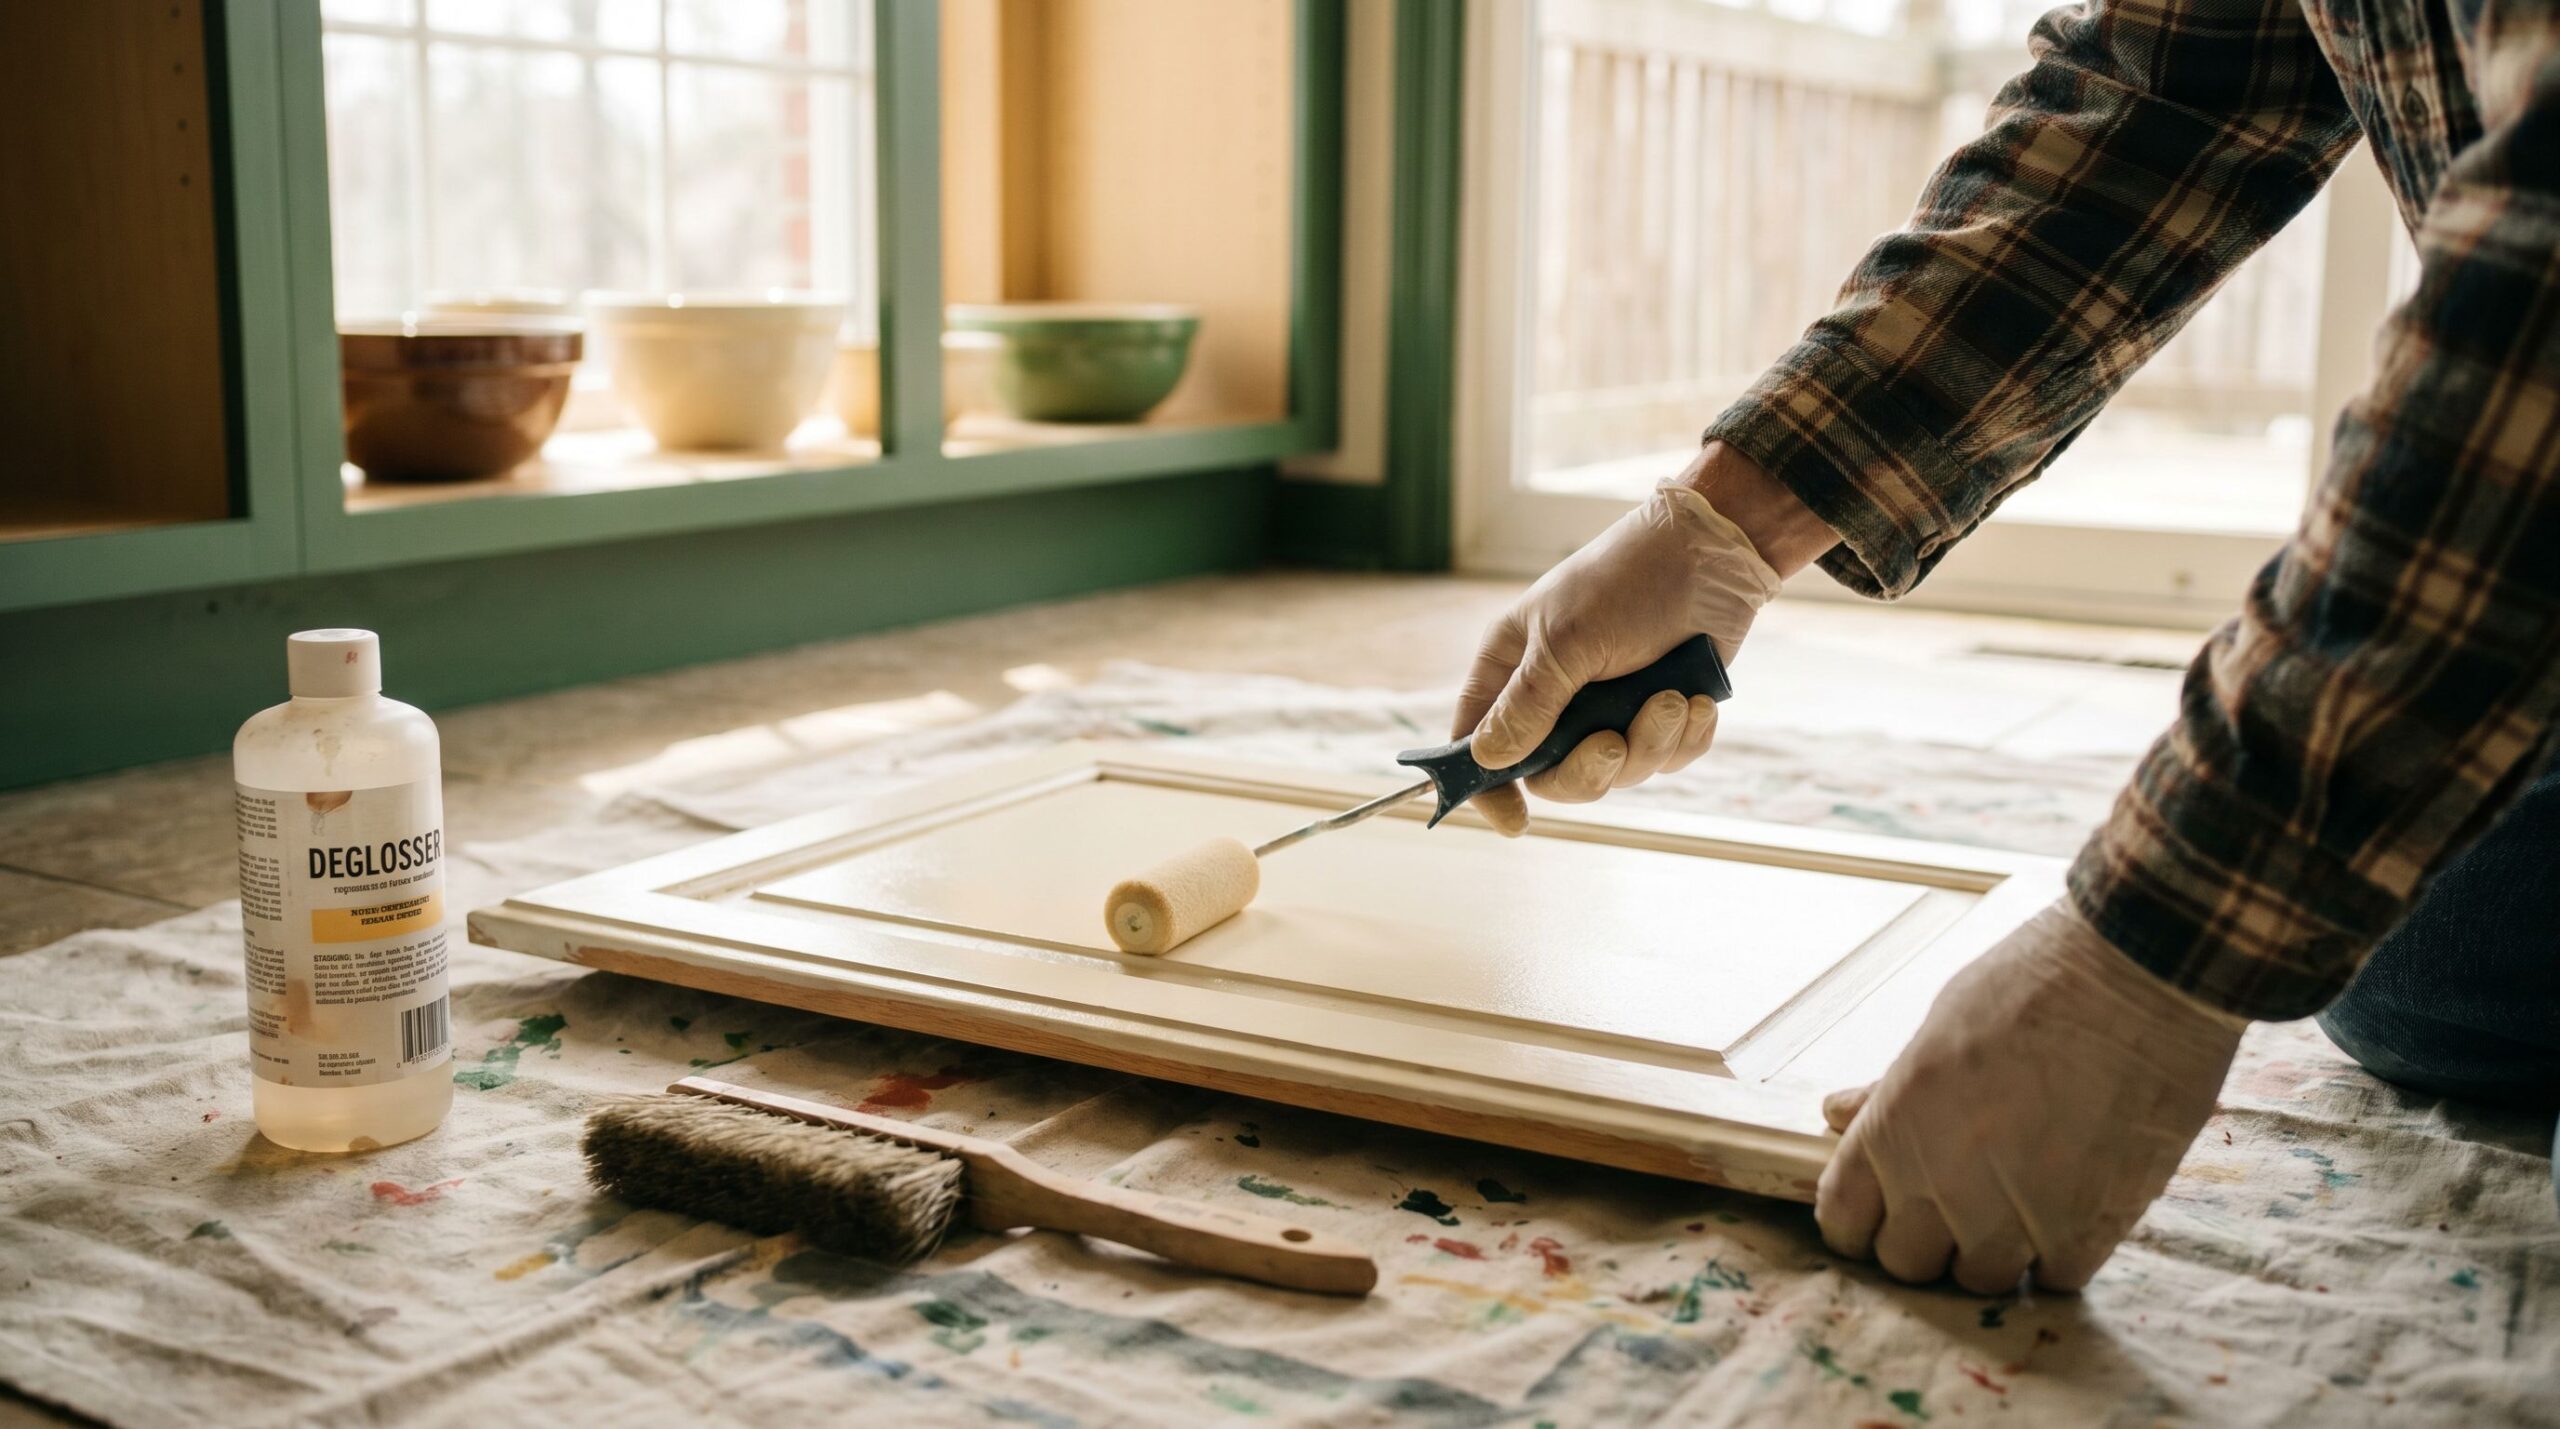
Step 3: Degloss instead of sand
Now the magic substitute for sanding. Wipe every surface with a liquid deglosser, following the directions on the can. It chemically dulls the slick factory finish so primer can bite into it. For any spots that are still shiny or have a drip of old finish, give them a quick rub with the 220-grit sponge by hand. That’s the only “sanding” you’ll do, and it makes basically no dust.
Step 4: Prime with a bonding primer
Don’t skip primer, and don’t grab whatever’s in the garage. Use a bonding primer made to grip slick surfaces. Roll the flat areas with a foam mini-roller and cut in the edges and any detail with the angled brush. One smooth, thin coat. Thin is better than thick here, every single time. Let it dry fully, usually overnight.
Step 5: Paint with cabinet enamel, thin coats
Use a real cabinet enamel, not wall paint, because cabinets get touched, washed, and banged. Wall paint stays soft and scuffs. Apply two thin coats of enamel, rolling the flats and brushing the details, letting each coat dry fully in between. Two thin coats beat one thick coat for both smoothness and durability. Resist the urge to glob it on to “get it done.”
Step 6: Let it cure, then rehang
Here’s where you have to be a grown-up about it. The paint is dry to the touch in a couple hours but not cured. Wait at least a few days, longer if you can, before rehanging doors and definitely before letting them touch each other. Reattach hardware, match your labeled doors to their openings, and step back. You just saved yourself a few thousand dollars.
The mistakes that ruin a no-sand paint job
Every one of these is a mistake I either made or watched a reader make. Avoid them and your cabinets will look great for years.
- Skipping the degrease. The number one cause of peeling paint. If you do one thing right, clean off the grease before anything else touches those doors.
- Using no primer because “the can says paint and primer in one.” On slick cabinets, you want a dedicated bonding primer. The all-in-one products are fine on walls and not great on glossy cabinet surfaces.
- Loading the brush and going thick. Thick coats stay tacky, sag, and show brush marks. Thin coats self-level and dry hard. Patience reads as skill here.
- Rehanging before it cures. Paint that’s dry but not cured will stick to itself and peel when doors separate. Give it days, not hours.
- Cheap roller, fuzzy finish. A lint-shedding roller leaves texture and fibers in your topcoat. A decent foam mini-roller is a few dollars and worth every cent.
- Wall paint instead of cabinet enamel. It’ll look fine for a month, then scuff and chip at every handle. Use the enamel made for the job.
How to get the smoothest possible finish
If you want results that make people ask who you hired, three small upgrades do most of the work. First, strain your paint or pour from a fresh can to avoid bits. Second, do the “tip off” trick: after rolling a section, lightly drag a barely-loaded brush across it in one direction to even out the texture. Third, work in good light at a low angle so you can see misses before they dry. None of this costs extra. It’s just attention.
If you genuinely want a glass-smooth, sprayed look and you’ve got the patience, renting a paint sprayer for $40 to $70 a day gets you there. But honestly, brush-and-roll with these tricks got me 90% of the way for zero rental cost, and nobody who’s stood in my kitchen has ever guessed I didn’t sand them.
Grab the free weekend project planner. I turned this whole cabinet method into a one-page checklist you can tape to the fridge: every step in order, the full materials list with checkboxes, and a dry-time tracker so you don’t rehang too early and ruin your finish. Print it, work down the list, and your first DIY cabinet job goes a lot smoother. It pairs perfectly with my renovation budget tracker if you’re costing out the whole kitchen.
What painting cabinets without sanding actually costs to supply
The no-sand method lives or dies on the deglosser-and-bonding-primer combo. Here’s a realistic supply list for an average kitchen so you can budget before you start.
| Supply | What it does | Est. 2026 cost |
|---|---|---|
| Liquid deglosser / TSP substitute | Replaces sanding—dulls and cleans the finish | $10–$20 |
| Bonding primer (1 qt–1 gal) | Grips slick factory finishes so paint sticks | $20–$45 |
| Cabinet/enamel paint (1–2 gal) | Durable, self-leveling topcoat | $45–$90 |
| Foam rollers + good angled brush | The smooth-finish workhorses | $15–$30 |
| Degreaser, tack cloth, painter’s tape | Prep and cleanup—grease is the silent killer | $15–$25 |
| Optional: paint additive (leveling) | Reduces brush marks for a sprayed look | $8–$15 |
The mistakes that blow a no-sand budget
- Skipping the degreaser. Cabinets near the stove carry invisible cooking grease. Paint over it and the whole finish peels—forcing a do-over that doubles your paint cost.
- Buying wall paint instead of cabinet enamel. Cheap flat paint scuffs in weeks on a high-touch surface. The “savings” disappear the first time you wipe a door.
- Rushing the primer dry time. Recoating before the bonding primer fully cures kills the bond. Patience here is free; redoing it isn’t.
Frequently Asked Questions
Can you really paint kitchen cabinets without sanding?
Yes. Instead of power-sanding, you clean off all grease and then use a liquid deglosser to dull the slick factory finish so paint can grip. Follow that with a bonding primer and a cabinet enamel. You skip the dusty heavy sanding, but you can’t skip the cleaning and degloss prep, which is what actually makes the paint stick.
What kind of primer do I use to paint cabinets without sanding?
Use a bonding primer specifically made to adhere to slick or glossy surfaces. That’s the part doing the work that sanding would normally do. Skip the all-in-one paint-and-primer products on cabinets, because a dedicated bonding primer grips much better on the smooth factory finish and stops the old color from bleeding through.
How long does it take to paint cabinets without sanding?
Plan for two weekends, but most of that is dry time, not work. The hands-on hours are roughly three for cleaning and removal, four for priming, and three each for two coats of enamel. Then let everything cure for several days before rehanging so the paint doesn’t peel when doors touch.
Will paint stay on cabinets if I don’t sand them?
It holds up well if you do the prep right. The two things that keep no-sand paint on are a thorough degrease and a quality bonding primer. Use cabinet enamel for the topcoat, apply thin coats, and let it cure. My cabinets have lasted two years of daily use this way with no peeling.
Curious whether DIY was really worth it over hiring out? I broke down every number in my cost to paint kitchen cabinets guide. And if you’re feeling the project momentum, here are weekend DIY projects to do before the holidays to keep it going.
Costs and timelines here are 2026 estimates and vary by your cabinet count, materials, and local prices. Use them as a planning guide, not exact figures.
Free DIY Project Cost Estimator
The spreadsheet I use to price out a project before I start, so a weekend job never blows the budget. Join the newsletter and I’ll send it over.
No spam, ever. Unsubscribe anytime. — Tessa
Keep reading — more on Easy DIY & Repairs
How to Fix a Leaky Faucet: Step by Step for Any Faucet Type
The first night it kept me up. Drip. Fifteen seconds. Drip. My bathroom faucet had started…
Read article →
How to Stain a Deck Yourself: A Weekend DIY (Step-by-Step)
Two summers ago I let my deck go gray and splintery because staining it sounded like…
Read article →
How to Install Vinyl Plank Flooring Yourself: A Step-by-Step Weekend Guide
The first plank I ever laid, I put down backwards. Tongue where the groove should go,…
Read article →
How to Keep House Cool Without AC: 12 Cheap Fixes That Actually Work
My first summer in this house, I ran the AC like it owed me money and…
Read article →