
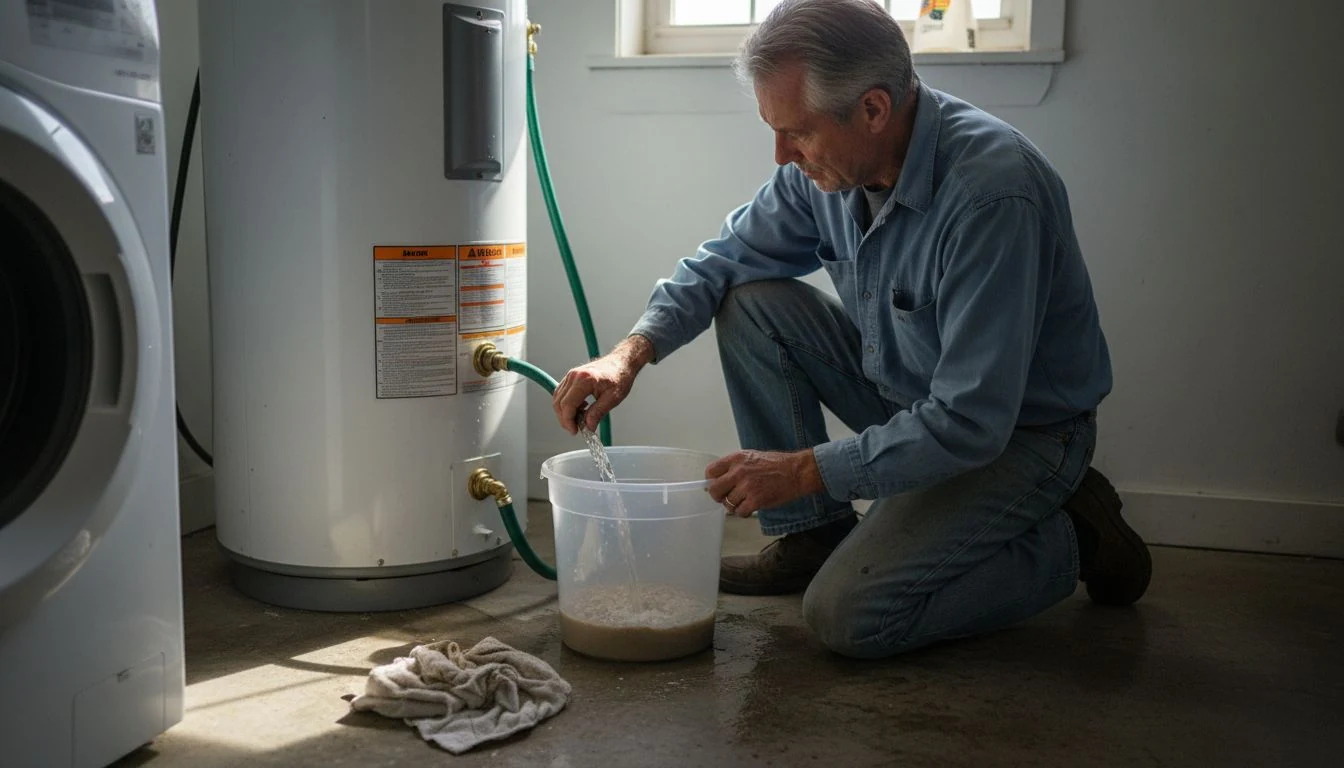
The first winter in this house, the water heater in my basement started making a noise like someone dropping gravel into a popcorn machine. Every time the burner kicked on: pop, crackle, pop. My neighbor Dale leaned on the doorframe, listened for maybe five seconds, and said, “That’s sediment. When did anybody last flush it?” Nobody had. The tank was a 50-gallon gas unit from 2016, and the sticker on the side had never been touched. So I learned how to do a water heater flush the slightly messy way, and I also called three plumbers to find out what they charge to do it for me.
Short version: a basic water heater flush on a tank unit takes one to two hours and about $5 worth of supplies if you already own a garden hose. A plumber usually charges about $100 to $250 to flush a tank, and about $150 to $350 to descale a tankless unit. If the drain valve is plastic and old, or the tank has never been flushed in ten years, that price can climb, and so can the risk of doing it yourself.
I’ve flushed mine three times now and kept notes: the steps, the two mistakes I made the first time, all three plumber quotes, and a table for deciding when DIY makes sense and when it doesn’t.
Jump to what you need:
- Why a water heater flush matters
- Before you start: gas, electric or tankless
- How to flush a water heater, step by step
- The two mistakes I made the first time
- Flushing a tankless water heater
- What a plumber charges for a water heater flush
- DIY vs pro: cost and time table
- Frequently Asked Questions
Why a water heater flush is worth an afternoon
Your tap water carries minerals. Heat a tank of it every day for years and those minerals drop out and settle on the bottom, right on top of the burner (gas) or around the lower element (electric). That layer is the sediment Dale was hearing. Water gets trapped under the crust, boils in little bursts, and you get the popping.
The noise is the least of it. ENERGY STAR’s guide on when to replace a water heater lists rumbling as a warning sign and says sediment can build up in a way that reduces the tank’s capacity. Less room for water means you run out of hot water sooner. And the burner has to fire longer to push heat through a layer of rock, which you pay for on the gas bill.
The EPA’s WaterSense home maintenance checklist puts it plainly: flush the water heater once a year to cut down on sediment, and check the temperature and pressure relief valve at least once a year too. I had done neither in two years of owning the place. Neither had the people before me, judging by what came out of that hose.
If you live somewhere with hard water (white crust on your shower head, spots on every glass), you probably need to flush more often than once a year. My town’s water is hard enough that I now do it every spring and fall. Some people with very hard water put in a softener, and our water softener installation cost guide covers what that runs.
Before your water heater flush: gas, electric or tankless?
The steps are almost the same for gas and electric tanks. The difference is how you shut off the heat, and that part matters more than anything else in this post.
Gas tank
Turn the gas control knob to “Pilot” or “Vacation.” On most newer tanks that’s the dial on the front of the gas valve. You don’t need to shut the gas line to the house. You just need the burner to stop firing while the tank is low on water.
Electric tank
Flip the breaker for the water heater off at the panel. Do not skip this. If the power stays on while the tank drains, the heating elements keep going with no water around them and can burn out in minutes. A new element and a service call to swap it will run you well over the cost of having a plumber do the whole flush.
Tankless
Tankless units don’t collect sediment the same way. They get scale inside the heat exchanger, and you clear it by pumping a descaling solution through, not by draining. I’ve got a separate section on that below.
One more check before you start: look at the drain valve near the bottom of the tank. Is it brass, or white or gray plastic? On my 2016 tank it was plastic. That turned out to be important.
How to flush a water heater, step by step
This is the routine I use now, after getting it wrong once. Budget about an hour and a half the first time. I’ve gotten it down to about 50 minutes.
What you need: a garden hose long enough to reach a floor drain, sump pit or the driveway; a flathead screwdriver or pliers for the drain valve; a bucket; work gloves; and a towel or two. Mine cost me nothing because I already had all of it. If you need a new hose, a 25-footer is about $15 to $25.
- Turn the gas to Pilot or Vacation, or turn the breaker off for electric.
- Let the water cool for a couple of hours if you can. Tank water is often set around 120 degrees, and it comes out of the hose hot enough to hurt. I start mine in the morning after everyone has showered, then wait until after lunch.
- Shut off the cold water supply valve on the pipe going into the top of the tank.
- Open a hot water tap somewhere upstairs, like a bathroom sink. This lets air in so the tank can actually drain.
- Screw the hose onto the drain valve and run the other end to your drain. Make sure the hose end sits lower than the valve.
- Open the drain valve slowly. Let the tank drain. A 50-gallon tank took me about 25 minutes.
- When it’s empty, open the cold supply valve for 10 or 15 seconds at a time with the drain still open. That burst of water stirs up the sediment on the bottom and pushes it out. Repeat until the water coming out of the hose runs clear in the bucket.
- Close the drain valve and take off the hose.
- Open the cold supply valve fully and let the tank fill. Leave that upstairs hot tap open until water runs out of it steadily, with no sputtering air.
- Only then turn the gas back to “On” or flip the breaker back on.
Step 10 is the one people rush. If the tank isn’t full when the heat comes back on, an electric element can burn out the same way it would during the drain. Wait for steady water at that faucet.
What came out of my tank the first time looked like wet sand mixed with little white flakes. I filled about a third of a five-gallon bucket with it. The popping went away the same night, and it took two more showers before I noticed the hot water was lasting longer in the morning.
The two water heater flush mistakes I made the first time
First, I didn’t open a hot tap upstairs. I opened the drain valve, the hose gurgled, a little water came out, and then almost nothing. I stood there for ten minutes thinking the valve was clogged with sediment. It wasn’t. The tank was holding a vacuum, the way your thumb on a straw holds the drink in. The second I opened the bathroom faucet, the hose jumped and started running.
The second mistake was the plastic drain valve. After the flush, I closed it, and it kept dripping. A slow drip, maybe one drop every few seconds. I tightened it harder, which is the wrong move with old plastic, and the drip got worse. I ended up screwing a $4 garden hose cap onto the end as a stopgap that night.
The next weekend, I drained the tank again and replaced the plastic valve with a brass ball valve, which cost me $19 at the hardware store. It’s a fine DIY job if you’re comfortable with plumber’s tape and a wrench, and it makes every flush after that easier. Two of the three plumbers I called offered to do that same swap for $75 to $125 on top of the flush.
If your tank is older than about ten years and has never been flushed, think hard before you open that valve. Sometimes the valve won’t reseat. Sometimes the sediment has been holding a weak spot in the tank closed, and flushing it out reveals a leak you already had. On a tank that old, I’d pay a plumber for the first flush and do the later ones myself.
How to flush a tankless water heater
I don’t have a tankless unit, but my sister does, and I helped her descale hers last spring. The job is different enough that it’s worth walking through.
Tankless heaters have isolation valves below the unit, usually with little service ports. You close the hot and cold valves, connect two short hoses to the ports, drop one end into a bucket with a small submersible pump, and circulate a descaling solution through the heat exchanger. Most manufacturers say plain white vinegar or their own descaler works. Her manual said to run it for 45 minutes. Then you flush with clean water, clean the inlet filter screen, and open the valves back up.
Her pump kit (pump, two hoses and the bucket) cost about $55. She’ll use it every year, so it paid for itself the first time compared with a service call. Read your own unit’s manual first. Some brands spell out the cleaning interval and the solution, and doing it wrong can matter if you ever need a warranty claim.
If your tankless unit doesn’t have isolation valves installed, stop there and call a plumber. Adding them is a plumbing job, and it’s about $150 to $300 on its own.
What a plumber charges for a water heater flush
I got three prices in the fall, mostly out of curiosity, since I’d already done the job myself. All three put their price in writing.
- A one-truck plumber: $129 to flush a standard tank, drain valve check included, and $95 more to swap a plastic drain valve for brass.
- A mid-size plumbing company: $189 for a “water heater maintenance visit,” which included the flush, a test of the temperature and pressure relief valve, and a look at the anode rod.
- A big outfit with ads everywhere: $245 for the flush with an anode rod inspection, or $99 if I signed up for their yearly maintenance plan at $14.95 a month.
That last one is the trick to watch for. A $99 flush sounds cheap until you add up $179 a year in plan fees. If the plan also covers your furnace tune-up and gives you real priority service, it can make sense. Our furnace tune-up cost guide breaks down what those maintenance plans actually include. If it’s only the flush, you’re paying extra for a coupon.
Prices go up if the plumber has to replace the drain valve, if the tank is in a crawl space or attic, or if it’s an emergency weekend call. The anode rod is the other common add-on. It’s a metal rod inside the tank that corrodes so the tank doesn’t. A replacement usually runs about $150 to $350 installed. I checked mine at the same time as my second flush, and it still had plenty of metal left.
If the plumber says the tank itself is done, get a written quote before you agree to a replacement on the spot. Our water heater replacement cost guide shows what a fair price looks like, and the guide to telling whether a contractor quote is fair has the questions I’d ask.
Some older homes call a big tank water heater a “boiler.” A boiler that heats your radiators is a different machine with a different price, and our boiler replacement cost guide covers that one.
Print this and tape it to the side of your water heater. Date of last flush: ______. Gas to Pilot, or breaker off. Cold supply off. Hot tap open upstairs. Hose on, drain open. Stir with short bursts of cold water until clear. Drain closed. Refill until the hot tap runs steady. Then heat back on. If you call a plumber, ask: is the T&P valve test included? Will you check the anode rod? What does a brass drain valve swap cost? Is there a plan fee hiding in this price?
Water heater flush: DIY vs pro cost and time
This is the table I put together after my own flushes and the three quotes. Use it to decide which jobs to do yourself and which to hand off.
| Job | DIY cost | Pro cost (2026 estimate) | DIY time | My call |
|---|---|---|---|---|
| Flush a gas or electric tank | $0 to $25 (hose) | $100 to $250 | 1 to 2 hours | DIY if the valve is in good shape |
| Quarterly mini-drain (a quart or two) | $0 | Rarely sold alone | 10 minutes | DIY |
| Replace plastic drain valve with brass | $15 to $25 | $75 to $125 added to a flush | About 1 hour with a drain | DIY if you’re handy with a wrench |
| Test the T&P relief valve | $0 | Usually included in a service visit | 5 minutes | DIY, but call a pro if it won’t stop dripping |
| Anode rod replacement | $30 to $60 (rod) | $150 to $350 | 1 to 3 hours | Pro if it’s seized |
| Descale a tankless unit | $40 to $60 (pump kit, vinegar) | $150 to $350 | About 1.5 hours | DIY if isolation valves are installed |
| First flush on a 10+ year old tank never flushed | Not recommended | $150 to $300 | N/A | Pro |
What blows the water heater flush budget
- Cranking down on a plastic drain valve. Over-tightening an old one is how a free flush turns into a leak and a weekend service call.
- Turning the heat back on too early. An electric element that fires in a half-empty tank can burn out, and replacing one costs more than the flush.
- Signing up for a plan to get the cheap price. A $99 flush tied to a monthly plan can cost more over a year than a $189 one-off visit.
If the water heater is just one item on a long house list, our overview of home renovation costs shows where it falls next to the bigger jobs.
I now flush mine on the first Saturday of April and the first Saturday of October, and I write the date on a strip of painter’s tape on the side of the tank. Last weekend’s flush ran clear in under five minutes of stirring. The basement is quiet when the burner kicks on now. Dale noticed before I did.
Frequently Asked Questions
How often should you do a water heater flush?
The EPA’s WaterSense program recommends once a year. If you have hard water, every six months is safer. Some people also drain a quart or two every few months to pull out loose sediment between full flushes.
How much does a plumber charge to flush a water heater?
Most plumbers charge about $100 to $250 to flush a tank water heater and about $150 to $350 to descale a tankless unit. Replacing a drain valve, an anode rod, or working in a tight attic or crawl space adds to that. These are estimates and vary by region.
Can flushing an old water heater cause a leak?
It can. On a tank that’s 10 or more years old and has never been flushed, an old drain valve may not seal again, and removing heavy sediment can expose a weak spot that was already there. For a first flush on an older tank, have a plumber do it, and ask them to check the anode rod at the same visit.
All prices here are 2026 estimates from my own receipts and written plumber quotes, and they vary by region, tank type and condition. Tessa is a hands-on homeowner, not a licensed plumber. Follow your water heater’s manual, and call a licensed pro for any gas line, venting or electrical work, or if your tank is leaking.
Free DIY Project Cost Estimator
The spreadsheet I use to price out a project before I start, so a weekend job never blows the budget. Join the newsletter and I’ll send it over.
No spam, ever. Unsubscribe anytime. — Tessa
Keep reading — more on Easy DIY & Repairs
Mini Split Maintenance: The DIY Checklist and What a Pro Charges
The smell showed up first. Our mini split lives in the room over the garage, the…
Read article →
How to Patch a Drywall Hole (The Three Sizes, and the One You Should Not DIY)
The doorknob went through the hallway wall on a Tuesday, and I want to be honest…
Read article →
How to Fix a Dripping Kitchen Faucet (Cartridge, O-Rings, and the Sprayer Hose Nobody Checks)
My kitchen faucet dripped for a summer. I told myself it was the aerator, because the…
Read article →
How to Fix a Leaking Shower Faucet: Cartridge, Two Handles, and No Shutoff
The guest shower dripped for eleven months before I did anything about it. Not a fast…
Read article →