
The smell showed up first. Our mini split lives in the room over the garage, the one we turned into an office and guest room, and one July afternoon it started blowing air that smelled like a gym bag left in a hot car. Two weeks later a thin line of water ran down the wall under it and left a tan stripe on the paint. That was the month I learned what mini split maintenance actually involves, and how much of it I could have been doing myself for about $30 a year.
Most mini split maintenance is a DIY job: rinse the filters every two to four weeks when the system is running hard, wipe the vanes, keep the drain clear, and keep the outdoor unit free of leaves and snow. A pro visit in 2026 usually runs about $100 to $250 for a one-zone system, plus roughly $50 to $100 for each extra indoor head. A deep cleaning, where the tech bags the indoor unit and washes the coil and blower wheel, costs more like $200 to $500 per head.
I got three quotes for that deep clean: $179, $420 and $650. I paid $420. The cheap one was a filter rinse with a fancier name, and the expensive one bundled a “treatment” and a plan I did not need.
I am a homeowner with a folder of receipts and a habit of asking techs what they are doing while they do it. I am not a licensed HVAC technician. This is my checklist, what I paid, and where I stopped and called someone.
Jump to what you need:
- Why mini splits get dirty faster than you think
- The DIY mini split maintenance checklist
- The outdoor unit
- What a pro charges, and for what
- Deep cleaning a mini split
- DIY vs pro cost table
- Frequently Asked Questions
Why a mini split needs more attention than central air
With central air, the filter sits in a hallway return or next to the furnace, and you change it every couple of months. A mini split is different. The filter, the coil and the fan all live in that white box on your wall, a few feet from where you sleep or work.
That means the filter is small and it clogs fast. It also means everything the filter misses lands right on a cold, wet coil. Dust plus moisture plus a dark box is how you get the smell I had. Our room over the garage gets hot, so the unit ran almost nonstop from June through August, and I had not opened the front panel once that summer.
The filters in most mini splits are also not doing what people assume. The EPA notes that ductless mini splits generally do not filter fine particles; the standard mesh is there to protect the machine from lint, hair and big dust. So rinsing it keeps the coil and fan healthy. It does little for the air you breathe, which surprised me, and made me stop buying “allergy” replacement filters.
If you have a ducted heat pump elsewhere in the house, the ideas overlap, and our heat pump maintenance guide covers that setup. This one is about the box on your wall.
The DIY mini split maintenance checklist
This is the list taped inside the closet in that room now. Turn the system off at the remote and at the disconnect or breaker before you touch anything inside the unit.
Every two to four weeks while it is running: the filters
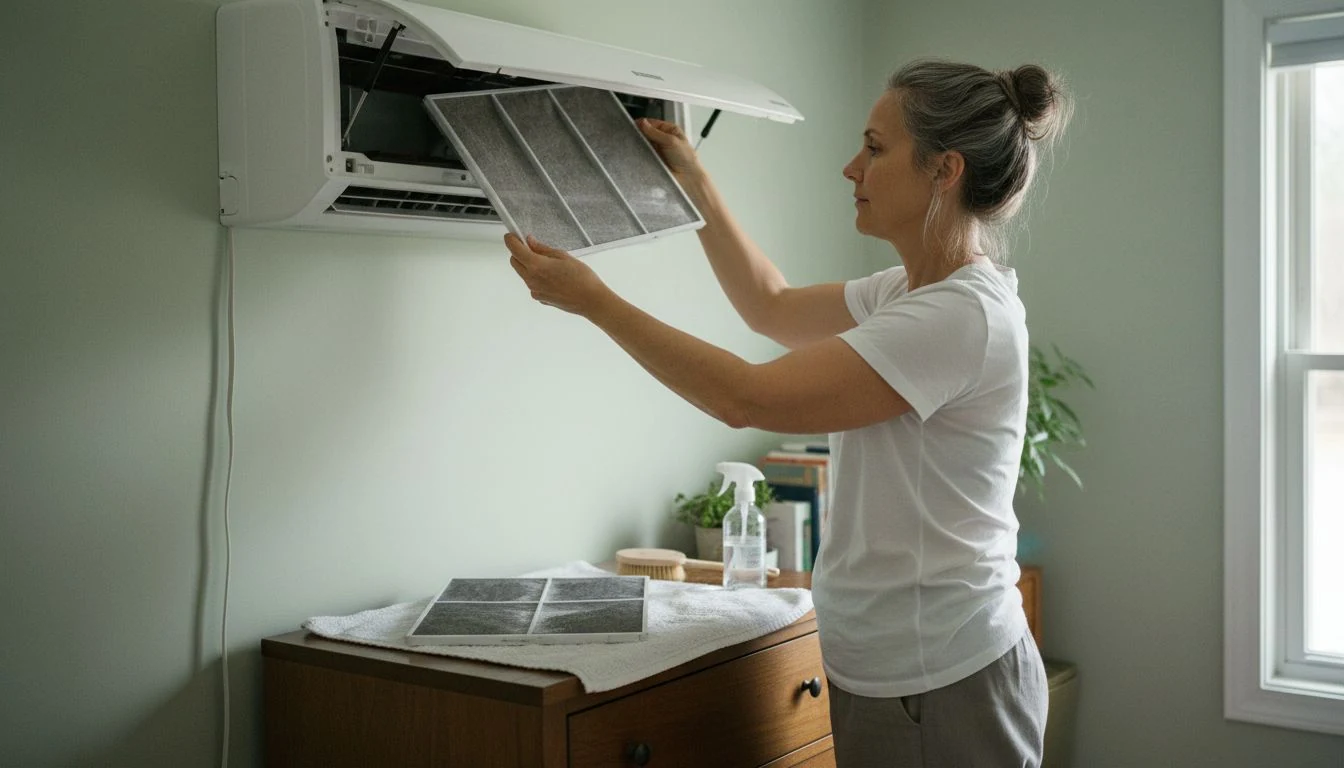
Lift the front panel. On most units it hinges up and clicks into place. The mesh filters slide up and out. Mine are two small panels, about the size of a sheet of printer paper cut in half.
Vacuum the loose dust off with a brush attachment, then rinse them from the back side under lukewarm water in the tub. Let them air dry fully. I stand them on a towel on the dresser for an hour. Do not put them back wet, and do not run the unit without them.
How often depends on your house. ENERGY STAR’s ductless heating and cooling page says to clean the filters when they are visibly dirty or when the filter light comes on. With a dog and a gravel driveway, mine are gray in about three weeks in summer. In spring and fall, when the unit barely runs, once a month or less is fine.
Cost: nothing. If a filter tears, a replacement is usually $10 to $35 from the manufacturer’s parts site. I keep a spare pair.
Monthly: the vanes, the grille and a flashlight
While the panel is open, wipe the louvers and the grille with a damp microfiber cloth. Then shine a flashlight up into the opening where the air comes out. You are looking at the blower wheel, a long drum with thin slats.
If the slats have black specks or fuzzy gray buildup, that is the smell. Light dust is normal. Black spots on the wheel or the vanes mean it is time for a real deep clean, and you can read how I handled that further down. This flashlight check takes twenty seconds and it is the one I skipped all summer.
Every season: the coil, gently
Behind the filters is the indoor coil, rows of thin aluminum fins. If you can see a film of dust on them, a no-rinse evaporator coil spray made for mini splits costs about $10 to $15 a can. Spray lightly, let it drip into the pan, and you are done.
The first time, I used a heavy foaming cleaner meant for outdoor coils and sprayed a lot of it. The foam lifted the gunk, the gunk slid into the drain pan, and the pan could not keep up. That is where the stripe on the wall came from. A tech charged me $185 to clear the drain line and told me, kindly, that “a little goes a long way.” Use a light spray. Don’t use a pressure washer or a garden hose on an indoor unit.
If fins are bent, a plastic fin comb runs $8 to $12. Go slowly and follow the direction of the fins.
Twice a year: the condensate drain
The indoor unit pulls water out of the air and sends it out a small drain line, usually a thin tube that exits the wall near the outdoor unit. Find where it ends outside. When the system is cooling on a humid day, water should drip out steadily.
If it is not dripping, or if you see water at the wall inside, the line may be clogged. Some people clear it with a wet/dry vac held on the outside end for a minute. I tried that after my leak and got a satisfying slurp of slime. If that does not fix it, or if the unit has a condensate pump, call a pro. Water running inside a wall is not something to wait on.
Mini split maintenance on the outdoor unit
The outdoor unit (the condenser) is easy to forget because it just sits there. It still needs a few minutes a season.
Keep about two feet clear around it. Trim shrubs, pull the weeds and move the recycling bin. In fall, clear leaves off the top and out of the fins with a soft brush or your hand. A shop vac on low works too.
If yours runs as a heat pump in winter, this part matters more. The unit needs to shed water and ice when it defrosts. Keep snow off it and away from the base, and never chip ice off the fins with anything sharp. Ours sits on a plastic stand about a foot off the ground, which the installer recommended for our snow, and I am glad he did. If yours sits on a pad in a spot where snow drifts, ask about a stand or wall bracket at your next service visit.
Once a season, gently hose the outdoor coil from the inside out if the fins look dirty, with the power off at the disconnect. Low pressure only. This is the one place a hose is fine.
What I leave to a pro outside: anything electrical in the disconnect box, refrigerant lines, and the little service ports. If the insulation on the refrigerant lines is cracked or missing, a tech can rewrap it for not much money, and it helps efficiency.
What a pro charges for mini split maintenance in 2026
A routine maintenance visit is not the same as a deep clean, and the quotes do not always say which one you are getting. Ask.
A standard tune-up usually runs $100 to $250 for a single-zone system, with each extra indoor head adding about $50 to $100. For that money, a good tech should clean or check the filters, look at the coil and blower wheel, flush or check the drain line, clean the outdoor coil, check electrical connections and refrigerant pressures, and look at the line set insulation. Mine took about an hour and a half for one head.
Maintenance plans are common. They usually run $150 to $300 a year and cover one or two visits plus a small discount on repairs. For a single head that you keep clean yourself, I do not think the plan pays off. With four or five heads and no time or ladder skills, it might.
When the tech finds a real problem, the visit becomes a repair. A weak capacitor on the outdoor unit is a common one, and our guide to AC capacitor replacement cost covers what that part runs. A refrigerant leak is the expensive one: finding and fixing a leak and recharging the system can run $400 to $1,500 or more depending on where the leak is. If your mini split is blowing warm or has frost on the lines, our AC repair cost guide lays out the common fixes.
Take this list to any mini split service quote. Is this a routine tune-up or a deep clean, and what exactly is included. Are you pulling the blower wheel or cleaning it in place. Will you flush the drain line and check the pan. Will you clean the outdoor coil and check refrigerant pressures. Is the price per system or per indoor head. What is the extra charge for a “treatment” or “antimicrobial,” and what is in it. Do I need the maintenance plan, or can I book once a year. Is the diagnostic fee credited if I approve a repair. Get the answers in writing, and compare two or three quotes line by line.
Once I had the quotes side by side, I checked them against our guide on how to tell if a contractor quote is fair. The $650 one had $130 for an “antimicrobial coil treatment” and a $199 plan folded into the price.
Deep cleaning a mini split: when to DIY it and when to pay
This is where my three quotes came from, and it is the part of mini split maintenance that homeowner forums fight about.
A deep clean means cleaning the parts the filter cannot protect: the coil all the way through, the drain pan, and the blower wheel. Techs usually hang a plastic bag under the unit that funnels into a bucket, spray a cleaner through the coil and wheel, and rinse it with a low-pressure sprayer. The really thorough version takes the unit’s plastic cover off and sometimes pulls the blower wheel out entirely.
The $179 quote was a filter rinse and a wipe of the vanes. That would not have touched the black specks on my blower wheel. The $420 quote was a full bag wash of the coil and wheel, drain pan cleaning and a drain line flush, about two and a half hours. That is the one I booked, and the smell was gone that night. The $650 quote was the same wash plus the treatment and the plan.
You can buy the same bag kits online for about $30 to $60, and some homeowners do the job themselves. I watched my tech do it and I am not going to. The cover has hidden clips, there are wires to the control board and the display, and you are spraying water inside an electrical appliance mounted on drywall. If you are handy and careful, and you have turned off the power at the breaker, it is doable. If you are not sure, the $200 to $500 a pro charges includes someone who knows where the clips are.
How often? If you keep up with the filters, most homes need a deep clean every one to three years. Mine had gone three summers, and with a dog, that was too long.
One more thing. If the mini split is old and the tech is quoting both a deep clean and a big repair, pause and look at the whole picture. The same age-times-cost math I used in our heat pump repair cost guide works here too.
Mini split maintenance cost: DIY vs pro
Find the job that matches your situation. These are 2026 estimates from my own invoices, three written quotes, parts and supply prices, and what other homeowners have told me.
| Job | How often | DIY cost | Pro cost |
|---|---|---|---|
| Rinse indoor filters | Every 2 – 4 weeks in heavy use | $0 | Included in a visit |
| Replacement filter pair | When torn or brittle | $10 – $35 | $40 – $90 installed |
| Light coil spray (no-rinse) | Once a season | $10 – $15 a can | Included in a tune-up |
| Clear condensate drain line | Twice a year or when leaking | $0 with a wet/dry vac | $75 – $250 |
| Clean outdoor unit and fins | Spring and fall | $0 – $12 for a fin comb | Included in a tune-up |
| Routine tune-up, one zone | Once a year | Not DIY | $100 – $250 |
| Each extra indoor head | Once a year | Not DIY | +$50 – $100 |
| Deep clean, bag wash of coil and wheel | Every 1 – 3 years | $30 – $60 kit, if you are confident | $200 – $500 per head |
| Annual maintenance plan | Yearly | None | $150 – $300 a year |
What blows the mini split maintenance budget
- Waiting for the smell. By the time a mini split smells, the blower wheel usually needs a full wash. Three minutes with the filters every few weeks would have saved me most of the $420.
- Using too much cleaner. My heavy foam spray clogged the drain pan and cost me $185 for a drain line call, plus a can of primer for the wall.
- Paying for add-ons you cannot explain. Ask what an “antimicrobial treatment” or plan actually includes. On my quote it was $329 of the $650.
If the mini split is one of several house projects competing for money this year, our overview of home renovation costs helps you see where it fits.
For the record, the room smells like nothing now, which is exactly how it should smell. I rinse the filters on the first Saturday of the month from May through September, and I set a phone reminder for the drain line in June. That is my whole routine.
Frequently Asked Questions
How often should a mini split be serviced?
Clean the filters yourself every two to four weeks when the system runs a lot, or whenever they look dirty or the filter light comes on. Have a pro do a tune-up about once a year, and a deep clean of the coil and blower wheel every one to three years depending on dust, pets and use.
How much does mini split maintenance cost?
In 2026, a routine pro visit is usually $100 to $250 for one zone, plus about $50 to $100 per extra indoor head. A deep clean runs about $200 to $500 per head. Doing the filters, drain and outdoor unit yourself costs almost nothing. These are estimates that vary by region and system.
Why does my mini split smell musty?
Usually because dust and moisture have built up on the coil, drain pan or blower wheel. Rinse the filters and look at the blower wheel with a flashlight. If you see black spots or buildup, the unit likely needs a deep clean. If water is also leaking, check the drain line.
All prices here are 2026 estimates gathered from real invoices, written quotes and parts prices, and they vary by region, brand, number of indoor heads and how dirty the system is. Tessa is a hands-on homeowner who has paid these bills and kept the paperwork, not a licensed HVAC technician or electrician. Turn off power before opening any unit, and hire a licensed pro for refrigerant, electrical and anything inside the unit you are not sure about.
Free DIY Project Cost Estimator
The spreadsheet I use to price out a project before I start, so a weekend job never blows the budget. Join the newsletter and I’ll send it over.
No spam, ever. Unsubscribe anytime. — Tessa
Keep reading — more on Easy DIY & Repairs
How to Patch a Drywall Hole (The Three Sizes, and the One You Should Not DIY)
The doorknob went through the hallway wall on a Tuesday, and I want to be honest…
Read article →
How to Fix a Dripping Kitchen Faucet (Cartridge, O-Rings, and the Sprayer Hose Nobody Checks)
My kitchen faucet dripped for a summer. I told myself it was the aerator, because the…
Read article →
How to Fix a Leaking Shower Faucet: Cartridge, Two Handles, and No Shutoff
The guest shower dripped for eleven months before I did anything about it. Not a fast…
Read article →
How to Fix a Leaky Bathtub Faucet (The Valve Behind the Wall)
The drip started in March and I ignored it until the last week of April, because…
Read article →