
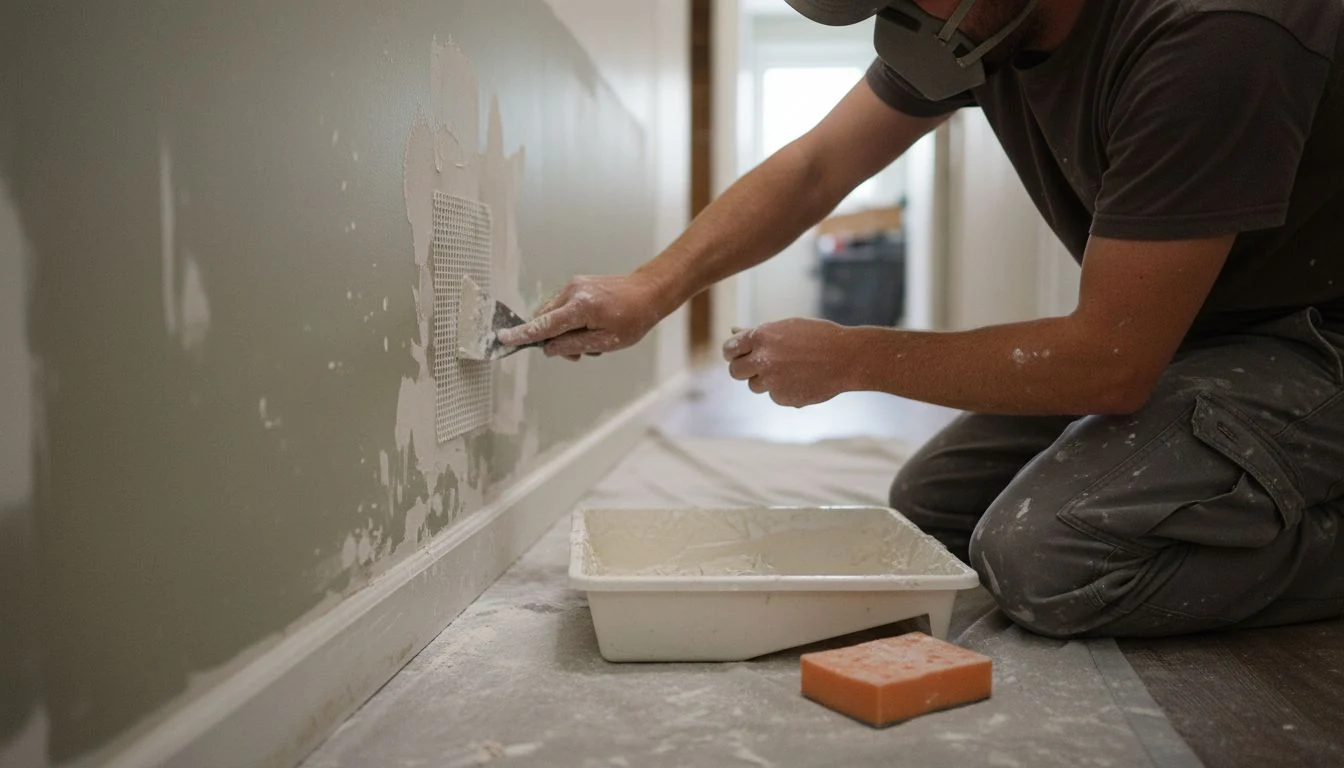
The doorknob went through the hallway wall on a Tuesday, and I want to be honest about what I did next: nothing, for eleven months. I hung a picture over it. Learning how to patch a drywall hole properly took me one afternoon, and I had spent almost a year avoiding a job that was shorter than a movie.
The reason I stalled is the reason most people stall. Most guides I found treated a nail hole and a fist-sized crater as the same project, so I assumed the doorknob one needed skills I did not have.
It does not. There are three sizes, they need three different approaches, and only one of them is fussy. There is also a fourth category that I want you to walk away from, which nobody seems to say out loud.
I am a homeowner who has patched something like thirty holes in two houses, not a licensed contractor. This post is the method, not the money. If you want to know what a pro charges by damage type, that lives in my drywall repair cost breakdown, and I deliberately keep numbers out of this one so it stays a how-to.
Jump to what you need:
- Why size decides the whole method
- Nail holes and hairline dings
- The doorknob hole and the mesh patch
- Holes bigger than your fist
- Patching in a rental
- The mud is the actual job
- Sanding, and the dust nobody warns you about
- The one you should not patch yourself
- Which compound to buy
- Frequently asked questions
How to patch a drywall hole depends entirely on its size
Drywall is a sheet of gypsum held up by studs every 16 inches. Once that clicked, the rest of it made sense. A small hole is a cosmetic problem, because the sheet around it is still doing its job. A big hole is a structural problem in miniature, because there is nothing behind the gap to hold anything you spread across it.
That single distinction decides your tools, your number of coats, and your afternoon. Under about 3 inches you are filling. Over about 6 inches you are rebuilding a small piece of wall. In between you are bridging.
This is the table I wish someone had handed me before I bought the wrong products twice.
| Hole size | What it actually needs | Main tool | Coats | Realistic timeline |
|---|---|---|---|---|
| Nail hole, screw hole, hairline ding | Fill only | Putty knife, 2 inch | 1, sometimes 2 | 10 minutes plus drying |
| Up to about 3 inches | Fill with a bridge over the gap | Self-adhesive mesh patch | 2 to 3 | Two short sessions, one day apart |
| 3 to 6 inches, the classic doorknob | Mesh patch or a California patch | 6 inch taping knife | 3 | Spread over 2 days |
| Over 6 inches | New drywall plus backing behind it | Drywall saw, 12 inch knife | 3, wider each time | Realistically a weekend |
| Anything wet, sagging, or on a ceiling | Diagnosis first, patch later | Stop and read the last section | n/a | n/a |
Nail holes and hairline dings are a ten minute job
This is the one people overthink. You do not need a patch kit for a nail hole. You need lightweight spackle and something flat.
Press the compound into the hole with a putty knife, then drag the knife across it at a low angle so the excess comes off and the surface sits flush with the wall. That is it. The mistake I made for years was mounding it up proud of the wall, thinking I would sand it back later. All that does is create a bump you then have to sand hard enough to scuff the paint around it.
One detail that matters more than it should: if the nail left a raised lip of torn paper around the hole, knock that flat with the back of the knife before you fill. Compound over a raised lip gives you a small volcano that shows up the moment light hits the wall sideways.
Renters, this is the entire skill you need for move-out day, and I go deeper on that in my notes on renter friendly decor.
The doorknob hole is where the mesh patch earns its keep
A hole between roughly 3 and 6 inches has no drywall behind it, so compound alone will fall straight through. You need something to bridge the gap and give the mud a surface to grab.
The easy answer is a self-adhesive mesh patch, which is a stiff metal or fiberglass screen with an adhesive rim. You clean the loose paper off the edges of the hole, press the patch on so it lies flat, and then you mud over it. The patch is only scaffolding. The repair is the three coats of mud that go over it, and one thick smear will not do the same job.
The harder but better answer is a California patch, sometimes called a butterfly patch. You cut a square of new drywall bigger than the hole, score and snap the gypsum off the back on all four sides while leaving the front paper intact, and you end up with a plug with a paper flange around it. That flange gets bedded in compound like tape. It is a better repair because the plug is real drywall rather than screen, and it is flatter, which means less mud to hide.
I use mesh for anything I am painting over soon and a California patch for a wall that gets side light. My hallway takes afternoon sun down its length, and mesh patches there announced themselves for two years before I redid them.
How to patch a drywall hole bigger than your fist
Once you are over about 6 inches, you stop patching and start doing carpentry. The gap is too wide for any screen to stay flat under a knife.
The sequence is: square up the hole, add backing, cut a plug, screw it in, then tape and mud. Squaring up feels wrong because you are cutting away good wall to make the damage bigger. Do it anyway. A ragged circle cannot be matched by a piece you cut; a rectangle can.
Backing is the step people skip and the reason patches later crack in an X shape. Slide two pieces of scrap wood behind the opening so they overlap the intact drywall on the left and right, screw through the wall into them, and now you have something to screw your new piece into. Furring strips work. So does a length of one by three. I have used a paint stir stick on a small one and it held fine.
Before you cut anything larger, know what is behind it. Electrical runs through stud bays, and so does plumbing on a wet wall. I cut a hand-sized opening once without looking and found a cable stapled across the back of the drywall about an inch from my saw. Nothing happened. It easily could have. Cut the first inch shallow with a utility knife rather than plunging a saw blade in.
How to patch a drywall hole in a rental without losing your deposit
Different goal here, and it changes the method. In your own house you want the wall to be right. In a rental you want the wall to be invisible to somebody doing a ten minute walkthrough with a clipboard.
Two things matter and neither is the patch itself. The first is texture. Most rentals have some kind of sprayed texture on the walls, and a perfectly smooth patch on a textured wall is more obvious than the hole was. Aerosol texture in a can exists for this, and you practice on cardboard first, never on the wall.
The second is paint. Touch-up paint almost never matches, even from the same can, because the wall around it has aged and the sheen has changed. If the patch is anywhere prominent, painting corner to corner on that one wall reads as clean, while a dab of touch-up reads as a repair. That is a judgment call about your deposit, and my interior painting cost guide has the math on doing a single wall.
The mud is the actual job, and almost everyone rushes it
If your patches look like patches, the mud is why. People obsess over cutting a clean hole and then rush the one part of the job that anybody can see.
Three thin coats, each one wider than the last, each fully dry before the next. First coat covers the patch and goes maybe an inch past it. Second coat goes 6 inches past the first in every direction. Third coat goes wider still with a 12 inch knife and is mostly about feathering the edges down to nothing.
The word feathering does a lot of quiet work there and it is worth being concrete about it. You are not spreading compound evenly like frosting. You are tilting the knife so it lays down more in the middle and almost nothing at the outside edge, so the repair rises off the wall gradually instead of stopping at a ridge. A ridge is what catches light. A ridge is what makes a stranger notice your wall.
My genuine mistake, made twice: I put on one heavy coat to save a day. Thick compound shrinks as it dries and it cracks, so I got a hairline crack straight across the patch, and I had to scrape it out and start over. The one heavy coat cost me more time than three thin ones would have.
Compound is cheap and drying time is free. Sanding a mistake flat is neither. Go thinner than feels productive.
Sanding decides whether anyone ever sees your patch
Sand with a sponge rather than a block if you have the choice, because a sanding sponge flexes and follows the feathered edge instead of cutting a flat spot into it. Around 150 grit is plenty. Aggressive grit tears the paper face of the surrounding drywall, which fuzzes up under paint and cannot be fixed by more sanding.
Then use the test that changed my results more than any tool. Turn the room lights off, hold a work light or your phone flashlight flat against the wall so the beam rakes across the patch, and look at the shadows. Under flat overhead light a bad patch looks fine. Under raking light every ridge and low spot shows up as a shadow, which is exactly what your wall will do at sunset. Fix what the shadows show you, then prime.
Prime the patch before painting. Bare compound is thirstier than the painted wall around it, so paint sinks in and dries duller there. That dull halo around an otherwise good patch is a primer problem, not a paint problem.
Now the part that most drywall tutorials leave out. Sanding compound makes a very fine dust that hangs in the air long after you stop, so wear a real respirator rather than a paper nuisance mask, close the door, and put a box fan in the window blowing out.
If your house was built before 1978, that dust question gets more serious, because you may be sanding through layers of lead paint. The detail that surprised me is who the rule is aimed at. The EPA regulation everyone cites for lead safe work covers people who are paid to disturb painted surfaces. The agency states plainly that the RRP Rule does not generally apply to homeowners doing projects in their own pre-1978 homes. Read that as what it is. The protection is aimed at the contractor you hire, and when you do it yourself nobody is regulating anything, so the containment is on you. Test paint before sanding old walls, and if there is lead, wet sand or hand scrape rather than making dust.
The one you should not patch yourself
Three walls get a hard no from me, and the reasons are different for each.
Any wall that is wet, stained, or soft. A brown ring or a spot that gives under your thumb is not a drywall problem. Something upstream is leaking, and closing the wall hides the evidence while the leak keeps going. Find the source first, which is often a supply line or a leaking shower valve in the bay behind. The EPA is specific about the clock on this: dry water damaged areas within 24 to 48 hours to prevent mold growth, and they set a rough threshold for calling in help at about 10 square feet of visible mold, which is roughly a 3 foot by 3 foot area. They also note that porous materials may have to be thrown out, and drywall is porous. Patching over a wet cavity means opening it again later and paying twice.
Ceilings. Not because the technique differs, because gravity does. You are working overhead with compound that wants to fall on your face, and a ceiling reads under raking light from every direction all day. It is the same job at three times the difficulty, and a sagging ceiling patch is a safety issue rather than an appearance one.
Anything within a few inches of an outlet, switch, or panel. Cutting blind near wiring is how a cosmetic job becomes an emergency. If the damage crowds an electrical box, that is a job for someone whose insurance covers it, and my notes on reading a contractor quote will help you judge what you get told.
Tessa’s shopping list for a doorknob hole. Self-adhesive mesh patch or a scrap of drywall for a California patch, a tub of lightweight all purpose compound, a 6 inch taping knife, a 12 inch knife for the last coat, a 150 grit sanding sponge, painters tape, a drop cloth, a respirator, and primer. That covers every hole in this post except the ones in the section above. Screenshot it before the hardware store.
Which compound to buy, because the aisle is confusing
This is where I wasted the most money, standing in front of a shelf of nearly identical buckets. They are not identical, and the difference is drying chemistry, not brand.
| Type | How it sets | Working time | Shrinks? | Best for |
|---|---|---|---|---|
| Lightweight spackle | Air dries | Long | Barely | Nail holes and dings only |
| Premixed all purpose | Air dries | Very long | Yes, noticeably | General patching, easiest to sand |
| Premixed lightweight | Air dries | Very long | Less | Second and third coats, sands fastest |
| Setting type, 20 minute | Chemical reaction | About 20 minutes | Very little | First coat when you want same day coats |
| Setting type, 90 minute | Chemical reaction | About 90 minutes | Very little | Deep fills and large patches |
The practical version: buy premixed lightweight for almost everything. Buy a bag of 20 minute setting compound only if you need to do three coats in one day, and mix small batches, because it sets in the pan whether or not you are ready.
What turns a twenty minute patch into a lost weekend
- One thick coat instead of three thin ones. It shrinks, it cracks across the middle as it dries, and the repair has to be scraped back out. This is the single most common way a simple patch fails, and it is entirely caused by impatience.
- Skipping the backing on a large hole. With nothing solid behind the plug, the patch flexes every time the wall gets bumped, and it telegraphs a crack in an X or a square outline within a season.
- Patching before finding the water. A stained or soft wall closed up over an active leak turns a cosmetic afternoon into framing repair and mold remediation, and you pay for the drywall work a second time.
Frequently Asked Questions
How long does drywall compound take to dry between coats?
Premixed compound needs a full 24 hours in most rooms, and longer if the room is humid or the coat went on thick. The reliable test is color rather than the clock, since compound dries from the outside in and goes from gray to uniform bright white when it is actually ready. Any gray shadow left in the middle means the core is still wet, and sanding it then will gum up your sponge and tear the surface.
Can I use spackle instead of joint compound on a large hole?
Not for anything past a nail hole. Spackle is formulated to fill small voids and resist shrinking, but it does not spread thin and feather the way joint compound does, so you cannot blend the edges into the wall. Use spackle for dings and switch to joint compound the moment you need a patch that has to disappear across a wide area.
Do I need mesh tape or paper tape for a drywall patch?
For patch repairs, self-adhesive mesh is easier because it sticks by itself and bridges a gap, which is exactly what a patch needs. Paper tape is stronger and lies flatter but has to be bedded in a layer of wet compound, which is a skill. Many pros pair mesh with setting type compound for the first coat, since mesh is slightly weaker and the harder compound compensates.
Why does my patch show through the paint after it dries?
Almost always one of two things. Either the edge was not feathered out far enough, so there is a ridge that catches light, or the patch was painted without primer, so the porous compound drank the paint and dried to a different sheen than the wall. Check the wall with a raking light before you paint, and always prime bare compound.
How big a hole can I patch before I should call someone?
Size alone is rarely the deciding factor, since a clean 10 inch hole in an accessible wall is a doable weekend project with backing and patience. What should send you to a pro is location and cause: ceilings, anything near wiring or plumbing, and any wall that is wet or stained. If you do hire out, the numbers by damage type are in my drywall repair cost guide.
The doorknob hole took me about forty minutes of actual work spread across three days of waiting. The picture I had hung over it for eleven months is now somewhere it actually belongs, and the wall behind it is just a wall.
Tessa is a hands-on homeowner, not a licensed contractor. Drywall repair is generally within reach for a careful beginner, but electrical, plumbing and structural work is not, and mold or water damage should be assessed before any wall is closed up. If your home was built before 1978, test for lead before sanding painted surfaces. Guidance here is general and does not replace an in-person assessment.
Free DIY Project Cost Estimator
The spreadsheet I use to price out a project before I start, so a weekend job never blows the budget. Join the newsletter and I’ll send it over.
No spam, ever. Unsubscribe anytime. — Tessa
Keep reading — more on Easy DIY & Repairs
Water Heater Flush: How to Do It Yourself (and What a Plumber Charges)
The first winter in this house, the water heater in my basement started making a noise…
Read article →
Mini Split Maintenance: The DIY Checklist and What a Pro Charges
The smell showed up first. Our mini split lives in the room over the garage, the…
Read article →
How to Fix a Dripping Kitchen Faucet (Cartridge, O-Rings, and the Sprayer Hose Nobody Checks)
My kitchen faucet dripped for a summer. I told myself it was the aerator, because the…
Read article →
How to Fix a Leaking Shower Faucet: Cartridge, Two Handles, and No Shutoff
The guest shower dripped for eleven months before I did anything about it. Not a fast…
Read article →