
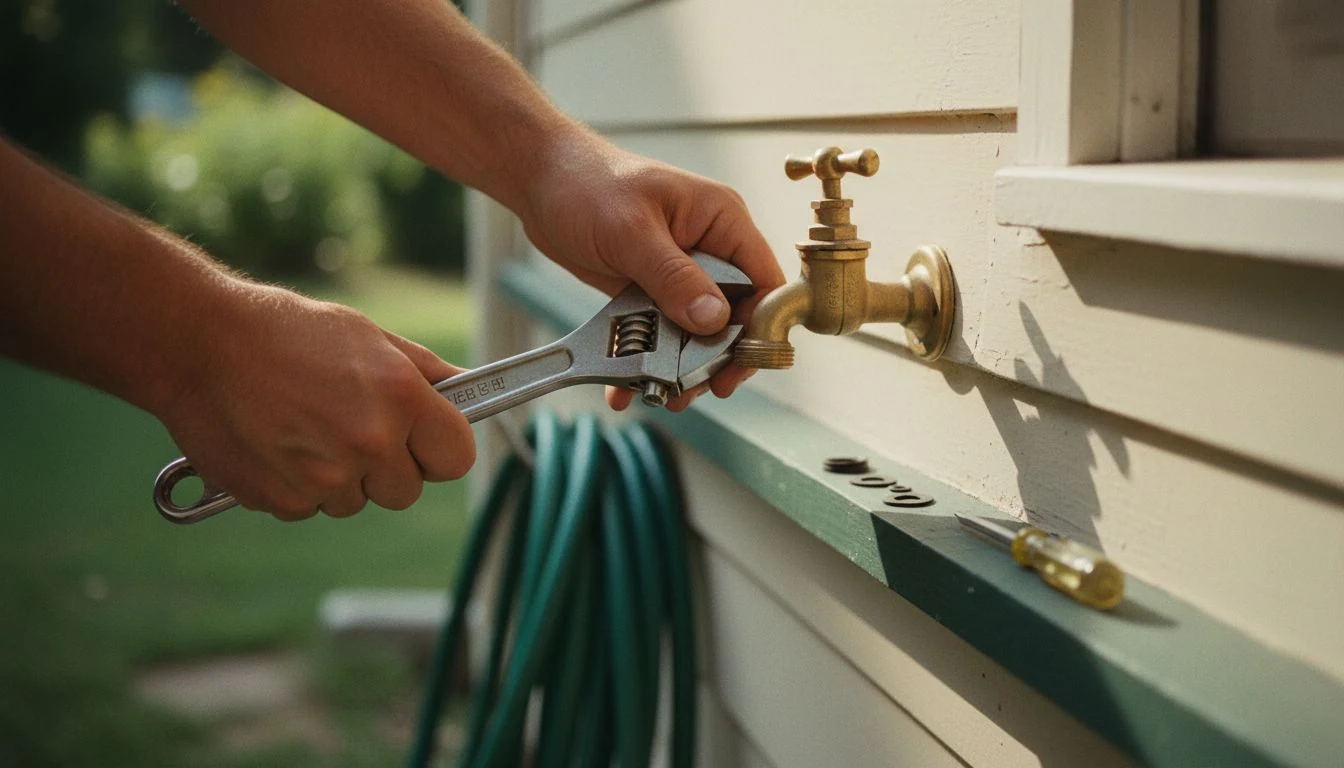
The first time I noticed my outdoor faucet dripping, it had been going for who knows how long. There was a little green stain running down the brick and a soft patch of mud under the spigot that never dried out all summer. I figured it was a plumber problem. It was a $6 problem and twenty minutes of my Saturday.
So before you call anyone, let me walk you through it. Learning how to fix a leaky outdoor faucet is genuinely one of the easiest, most satisfying repairs in the whole house, and the part that drips is almost always a rubber washer the size of a dime. You don’t need to sweat any pipes, you don’t need a torch, and you don’t need to be handy. You need an adjustable wrench, a screwdriver, and a washer that costs less than a coffee.
Outdoor faucet repair: which problem do you actually have?
Almost all outdoor faucet repair comes down to four things: a drip from the spout (a worn washer, about $6), water seeping at the handle (a loose packing nut), a leak from the little cap on top (a failed vacuum breaker), or a handle that spins without shutting the water off (a stripped stem). The first three take about twenty minutes with a wrench.
Whether you call it an outside faucet, an exterior faucet, a garden faucet, a hose bib, a spigot, or a sillcock, it is the same part and the same short list of repairs. Find your symptom below and you will know which one you are doing before you buy anything.
First, figure out where it’s actually leaking
This is the step everybody skips, including me the first time, and it’s the one that tells you which two-minute fix you actually need. Go out there with the water on and look. An outdoor faucet (you’ll also hear it called a hose bib, a spigot, or a sillcock) leaks in one of three spots, and each one points at a different worn part.
- Dripping from the spout when the faucet is fully off. This is the classic. The rubber washer down inside the valve has gone hard and cracked. It’s the most common leak and the cheapest to fix.
- Water seeping out around the handle when the faucet is on. That’s the packing nut behind the handle. Usually it just needs snugging up, and if that doesn’t do it, the packing washer underneath it is worn.
- Dripping from that little cap on top (the part that sticks up at an angle). That’s the vacuum breaker, the anti-siphon part. Its gasket is shot. There’s a cheap repair kit for exactly this.
Mine was the first kind, dripping from the spout with the handle cranked all the way closed. Knowing that before I touched a wrench meant I bought the right $6 part on the first trip instead of my usual three.
The tools and parts you’ll need
Here’s the whole shopping list, and it’s short. Total cost ran me under $10, and I had most of it in a drawer already.
- An adjustable wrench (or a set of regular wrenches)
- A Phillips and a flathead screwdriver
- A washer assortment kit, about $5 to $8 at any hardware store
- A little tube of plumber’s grease, around $4 and it lasts forever
- Teflon tape, optional, a couple of dollars
If your leak turned out to be the vacuum breaker on top, grab a vacuum breaker repair kit instead, usually $8 to $12 and labeled for your faucet brand. And if the whole spigot is corroded and ancient, a brand-new hose bib is only $10 to $20 and installs the same way you’re about to take this one apart. Compare any of that to a plumber’s minimum service call, which runs $125 to $350 in most of the country, and you can see why I get a little evangelical about this one.
How to fix a leaky outdoor faucet, step by step
Block off about twenty minutes. The actual work is ten, but the first time you’ll want to go slow and look at everything as it comes apart. Here’s exactly what I do.
1. Shut off the water. A lot of houses have a dedicated shutoff for the outdoor faucet on the inside wall, right where the pipe heads outside, often in the basement or a crawlspace. Close that. If you can’t find one, shut off the main to the house. Don’t skip this. I once decided a faucet “wasn’t leaking that bad” and pulled it apart with the water live, and I gave my garage a quick pressure wash I did not ask for.
2. Open the faucet to drain it. Turn the handle all the way on and let the leftover water in the pipe run out. When it stops, you’re good.
3. Unscrew the packing nut. That’s the six-sided nut right behind the handle. Put your adjustable wrench on it and turn counterclockwise. It may be stiff the first time in years. Once it’s loose, the whole stem assembly, the handle and the long shaft attached to it, should unthread and pull straight out.
4. Find the washer at the very end. Look at the tip of the stem you just pulled out. There’s a rubber washer held on by a single brass screw. If it’s flat, cracked, grooved, or hard as a cracker, that’s your leak right there. Mine was practically fossilized.
5. Swap the washer. Unscrew that little brass screw, pop off the old washer, and match a new one from your kit by size. Set it on, drive the screw back in snug but not gorilla-tight. While you’ve got it open, smear a thin film of plumber’s grease on the new washer and the threads. It makes the handle turn like butter and helps the next washer last longer.
6. Check the packing washer too. If your leak was around the handle, there’s a second washer or an O-ring up near the packing nut. Replace that one the same way, or wrap a few turns of Teflon tape if it’s a string-style packing.
7. Reassemble and test. Slide the stem back in, hand-thread the packing nut, then snug it with the wrench (firm, not cranked). Turn your water supply back on slowly. Run the faucet, shut it off, and watch. Dry spout, dry handle. That’s the whole thing.
The first time I did this I kept waiting for the catch, the part where it turned into a real plumbing job. It never came. I stood there turning the water on and off like an idiot just to watch it not drip.
The other outdoor faucet repairs (when it is not a drip)
A drip is the common one, but people search for outdoor faucet repair with a few other failures too, and each has a tell that points straight at the part.
The handle turns and turns but the water will not shut off. The square or splined tip of the stem has rounded off, or the handle itself has stripped. Pull the stem the same way you would for a washer swap and look at the tip. A replacement handle runs $5 to $10; a new stem for a frost-free faucet is $15 to $45 and has to match the brand and length, so take the old one to the store with you.
The flow dropped to a trickle. Nine times out of ten it is the aerator or the hose threads packed with mineral scale, not the plumbing. Unscrew anything threaded onto the end, soak it in white vinegar overnight, and scrub it with an old toothbrush. If the flow is still weak with everything off the end, the problem is upstream and worth a plumber’s opinion.
Nothing at all comes out the first warm day of spring. Stop and treat this as a possible split pipe from a freeze, not a faucet repair. Have someone watch the pipe inside the wall or basement while you crack the valve open, and shut it off immediately if water shows up indoors.
The whole spigot is corroded and you would rather just replace it. A threaded hose bib is honestly an easier job than the washer swap: shut the water, unthread the old one, wrap the male threads with Teflon tape, and thread the new one on. That is $10 to $20 of parts. Soldered copper is the one exception, and that is where I hand it to a pro.
The indoor version of this repair follows the same logic with different guts. If it is a kitchen or bathroom tap giving you trouble instead, I walked through that one separately in my guide to fixing a leaky faucet indoors.
Why a tiny drip is worth fixing today
It is wildly easy to look at a slow drip and decide it can wait until next year. Here’s the number that changed my mind. According to the EPA’s WaterSense program, a faucet that drips just once per second wastes more than 3,000 gallons of water a year. That’s enough for over 180 showers, running out of a faucet you’re not even using, straight onto your foundation.
And it adds up across a house. The EPA estimates that household leaks waste nearly 10,000 gallons every year for the average home, close to a trillion gallons nationwide. A dripping outdoor faucet is also the one most likely to quietly soak the soil against your foundation or keep a spot of siding wet, and water sitting where it shouldn’t is how small problems turn into the expensive kind. Twenty minutes now is cheap insurance.
When it’s not the faucet (and you should call a pro)
I’m all for doing this yourself, but I’ll never tell you to fight a job that’s genuinely over your head, because that’s how a $6 fix becomes a flooded wall. Stop and call a plumber if you hit any of these:
- Water is coming out of the wall or pipe, not the faucet. If the leak is behind the spigot where it enters the house, that’s a pipe problem, and it may mean a cracked line from a past freeze.
- The pipe is frozen or you’ve had a hard winter and never drained the line. A split pipe behind the wall won’t show itself until you turn the water on in spring, and that’s a pro repair.
- The connection is soldered copper and corroded. Replacing a threaded hose bib is easy. Sweating a new joint onto copper is a different skill, and a leak inside a wall is not the place to learn it.
Knowing which jobs are yours and which ones aren’t is honestly the most valuable thing I’ve learned owning a house, and it’s the same instinct that keeps you from overpaying. If you ever do get a quote for the bigger version of this, my guide on whether your contractor quote is fair walks through how to read it without getting taken. For the simple weekend stuff, though, this faucet belongs firmly in the do-it-yourself column, right alongside the other small wins I keep in my list of weekend DIY projects. And if you’re new to all this, the same low-stakes, no-fancy-tools approach is exactly how I tackled my cabinets in painting kitchen cabinets without sanding.
Grab my free Project Cost Estimator
Before any home project, I jot the parts, the rough cost, and a DIY-or-pay-for-it tag on one sheet so I know my real number going in. Print it, fill it in for your next fix, and you’ll never guess at a budget again. No fluff, no upsell.
What it costs to fix a leaky outdoor faucet yourself vs. calling a plumber
Before you decide whether to grab a wrench or grab the phone, it helps to see the actual numbers side by side. Here’s what the same repair runs as a DIY job versus a service call in 2026 (typical U.S. ranges that vary by region and how bad the leak is).
| Repair path | Parts | Tools you may need | Typical total |
|---|---|---|---|
| DIY: replace washer & packing | $3–$12 | Already own (wrench, screwdriver) | $3–$15 |
| DIY: replace frost-free stem | $15–$45 | Adjustable wrench, plumber’s tape | $18–$60 |
| DIY: full faucet swap | $20–$70 | Pipe wrench, possibly a torch/fittings | $25–$110 |
| Plumber: minor repair | Included | Their truck | $120–$250 |
| Plumber: faucet replacement | Included | Their truck | $200–$450+ |
Where people go wrong on this repair
- Skipping the shutoff. Turning the handle without killing the water supply first turns a $5 washer swap into a soaked basement and a real bill.
- Overtightening the packing nut. Cranking it down to “stop the drip” cracks the stem or strips threads, and now you genuinely do need a new faucet.
- Ignoring a frost-free faucet that leaks only when the hose is on. That’s usually a failed vacuum breaker, a $10 part, not the whole faucet — don’t let anyone upsell you the full replacement.
FAQ
How do I fix a leaky outdoor faucet myself?
Shut off the water to the faucet, open the handle to drain it, then unscrew the packing nut behind the handle and pull out the stem. The rubber washer at the tip is almost always the culprit, so swap it for a matching one from a washer kit, add a little plumber’s grease, reassemble, and turn the water back on. The whole job takes about twenty minutes and costs under $10 in parts.
Why is my outdoor faucet leaking from the handle?
A leak around the handle while the water is on usually means the packing nut has loosened or the packing washer underneath it has worn out. Try snugging the packing nut with a wrench first. If it still seeps, take the stem out and replace the packing washer or O-ring near the top of the assembly, or wrap fresh Teflon tape on a string-style packing.
How much does it cost to fix a dripping outdoor faucet?
Doing it yourself runs about $5 to $12 for a washer kit or a vacuum breaker repair kit, and a whole new hose bib is only $10 to $20. Hiring a plumber for the same job typically costs $125 to $350 because of the minimum service call. For a simple washer replacement, the DIY route saves you the most money of nearly any repair in the house.
My outdoor faucet will not shut off completely. How do I fix it?
If the handle spins freely or keeps turning without stopping the flow, the stem tip or the handle has stripped rather than the washer wearing out. Shut off the water, pull the stem, and inspect the square tip and the handle broach. A new handle is $5 to $10 and a replacement frost-free stem is $15 to $45. Match the brand and stem length exactly, so bring the old part to the store.
Can I repair an outdoor faucet instead of replacing it?
Usually yes. A drip, a handle leak, and a leaking vacuum breaker are all repairs with $5 to $12 parts, and they solve the large majority of outdoor faucet problems. Replacement makes sense when the body is badly corroded, the threads are chewed up, or the faucet froze and cracked over winter. A new threaded hose bib is only $10 to $20, so replacing is not expensive either if the repair does not hold.
Is a dripping outdoor faucet a big deal?
It wastes more water than it looks like. The EPA estimates a faucet dripping once per second loses over 3,000 gallons a year, and a leak against your house can keep the soil and siding wet enough to cause real damage over time. Because the fix is so quick and cheap, it’s worth handling the same week you notice it rather than letting it run all season.
This is a general DIY guide based on my own experience with standard outdoor faucets. Exact parts and steps vary by faucet type and brand, and if your leak is coming from inside the wall or a frozen pipe, treat it as a plumber’s job rather than a weekend fix.
Free DIY Project Cost Estimator
The spreadsheet I use to price out a project before I start, so a weekend job never blows the budget. Join the newsletter and I’ll send it over.
No spam, ever. Unsubscribe anytime. — Tessa
Keep reading — more on Easy DIY & Repairs
Water Heater Flush: How to Do It Yourself (and What a Plumber Charges)
The first winter in this house, the water heater in my basement started making a noise…
Read article →
Mini Split Maintenance: The DIY Checklist and What a Pro Charges
The smell showed up first. Our mini split lives in the room over the garage, the…
Read article →
How to Patch a Drywall Hole (The Three Sizes, and the One You Should Not DIY)
The doorknob went through the hallway wall on a Tuesday, and I want to be honest…
Read article →
How to Fix a Dripping Kitchen Faucet (Cartridge, O-Rings, and the Sprayer Hose Nobody Checks)
My kitchen faucet dripped for a summer. I told myself it was the aerator, because the…
Read article →