
The inspector on my fixer-upper offered a radon test as a $150 add-on, and I almost said no. It was the last line on a long invoice, and I had already spent the morning learning what the roof was going to cost me.
I said yes. Two days later the number came back at 6.8, and I had to look up what the unit even was.
Here is the short version I wish someone had handed me that week. A radon mitigation system cost for most houses in 2026 lands between about $900 and $2,500, installed, with a basement or slab house and one suction point sitting near the bottom of that range. Crawl spaces, multiple foundations and interior pipe runs push it up. I paid $1,480, and I had three quotes on the table: $1,150, $1,480 and $2,900.
What separated those three numbers turned out to be most of the lesson. The rest was a test I ran wrong, a Saturday of caulking I should have skipped, and a running cost nobody mentioned until the fan was already on the wall.
Jump to what you need:
- Radon mitigation system cost in 2026, line by line
- First, find out whether your house needs one
- What you are actually buying
- What pushes the price up
- Reading three radon quotes side by side
- The radon work you can do yourself
- After the install: the retest, the fan and the bill
- Radon system installation cost by house type
- Frequently Asked Questions
Radon mitigation system cost in 2026, line by line
The EPA will not give you a dollar figure, and after reading their material I understand why. Their page on what a radon mitigation system can cost says most homes “can be fixed for about the same cost as other common home repairs,” and that your costs depend on the size and design of the house and which methods it needs. That is true and useless when you are holding a quote.
These are the line items I saw, plus what the three companies told me when I asked them to break their numbers apart.
| What you are paying for | Typical 2026 range | Notes |
|---|---|---|
| Sub-slab system, one suction point | $900 – $2,000 | Basement or slab house. The common job |
| Each extra suction point | $250 – $600 | Needed when air does not move well under the slab |
| Crawl space membrane plus suction | $1,500 – $3,500+ | Plastic sheet over the dirt, fan pulls from under it |
| Interior pipe route through a closet or attic | add $300 – $800 | Looks cleaner outside, costs more labor inside |
| Crack and floor-joint sealing | $100 – $500 | Helps the system. Never a fix by itself |
| New outdoor outlet for the fan | $150 – $400 | Only if there is no circuit where the fan goes |
| Independent post-install test | $20 – $250 | Kit you mail in, or a separate tester |
My $1,480 was one suction point through the basement slab, an exterior pipe up the side of the house to above the roofline, the fan mounted outside, sealing along the floor joint, and a gauge on the pipe. The quote that came in at almost double was a different design entirely, with most of the extra money going into the route the pipe took.
First, find out whether your house needs one
You cannot see, smell or feel radon. The only way to know is a test, and it is the cheapest step in this whole post.
The EPA’s rule is short. Its Consumer’s Guide to Radon Reduction says to fix your home “if your radon level is confirmed to be 4 picocuries per liter, pCi/L, or higher,” and that levels under 4 “still pose a risk, and in many cases may be reduced.” Between 2 and 4, the guide says you “may want to consider fixing.” For scale, the same guide puts normal outdoor air at about 0.4.
Note the word confirmed. The EPA’s recommendation is based on one long-term test or the average of two short-term tests, not a single short one. My 6.8 was a single test from the inspection, so before I called anyone I ran my own.
And I ran it wrong. It was May, the basement windows were open for the paint smell, and my kit came back at 2.1. I was thrilled for about an hour, until I reread the instructions. Short-term tests are meant to run with the house closed up, windows and doors shut for 12 hours before and during the test apart from normal coming and going. The second kit, run properly with the windows shut, read 5.9. With the windows open, I had mostly measured my backyard.
Before you spend a dollar on mitigation, get these four things down on paper. Your test result and the date it ran. Whether the house was closed up for 12 hours before and during the test. Whether it was one short-term test, two averaged, or a long-term test. And which level it was placed on, since the lowest lived-in floor is where the reading means the most. A contractor who never asks about any of this is quoting you a system without reading your test.
What you are actually buying
The word “system” made me picture something with a control panel. It is a pipe, a fan and a gauge.
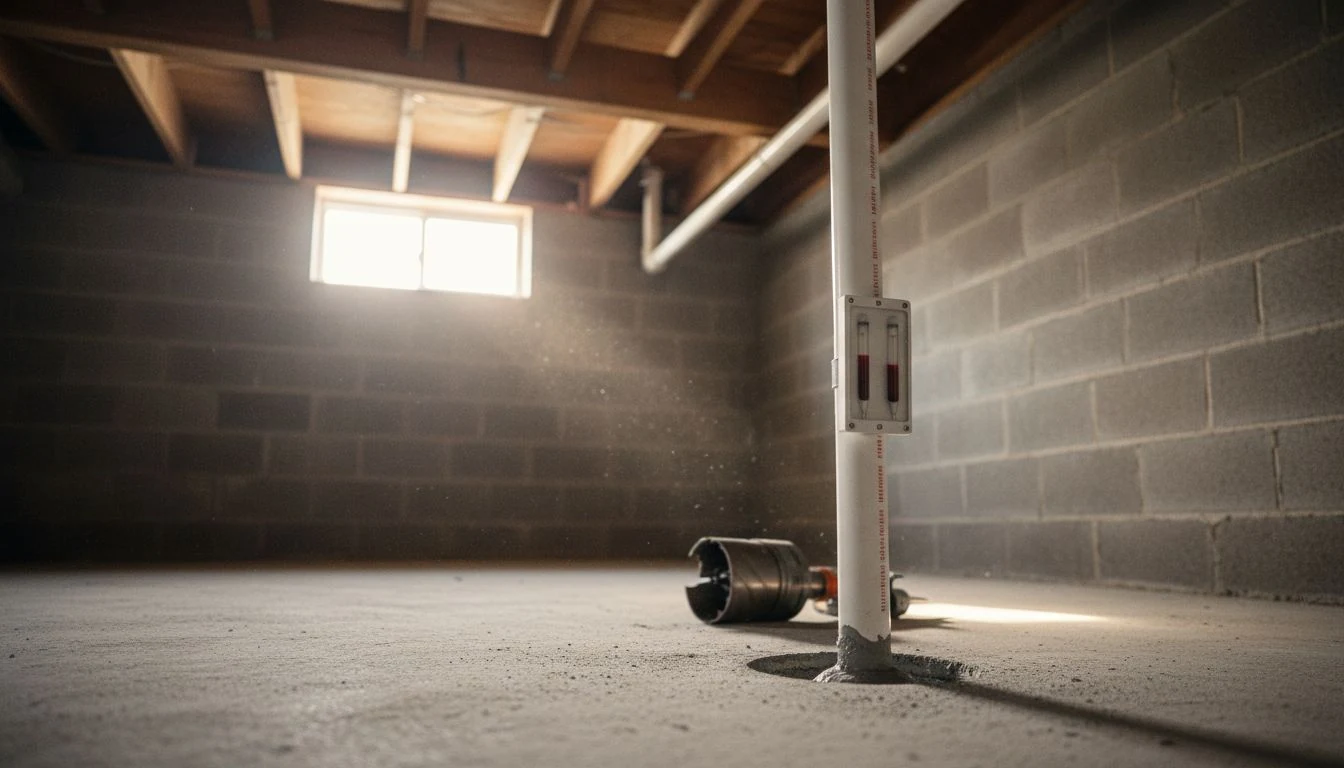
The most common design is called sub-slab depressurization, or active soil depressurization. A contractor drills a hole through the basement floor, digs out a small pit in the gravel underneath, and seals a PVC pipe into it. The pipe runs up and out of the house. A fan in that pipe, outside the living space, pulls air from under the slab and pushes it out above the roof. The EPA guide says a single suction point is often enough, and that some systems cut radon levels by up to 99 percent.
If you have a sump pit, it can often be sealed with a lid and used as the suction point, which can save a hole. If the house sits on a crawl space, the usual method is a heavy plastic sheet laid over the dirt with the suction pulling from underneath it. The EPA calls that submembrane suction and, done properly, the most effective approach for crawl spaces. If you are already pricing crawl space encapsulation, ask about both jobs together, because a lot of the liner work overlaps.
The gauge is the part I now look at weekly. Mine is a U-shaped tube of colored liquid clipped to the pipe. When the fan is pulling, the two sides sit at different heights. If they level out, the fan has stopped. The EPA guide says every active system should have a warning device for exactly this reason, placed somewhere you will see or hear it.
What pushes the price up
The EPA lists the factors as your starting radon level, installation and operating costs, home size and foundation type. In practice, four things moved my quotes, and the first is what the house sits on.
A basement or slab with clean gravel under it is the cheap case. Crawl spaces cost more because of the membrane. Houses that mix a basement with a crawl space or a slab addition sometimes need a suction point for each section.
Then there is how air moves under the slab. Tight clay or no gravel layer means the fan cannot pull evenly, and the fix is more suction points. Good contractors check this with a quick diagnostic test before they design anything. That is what the EPA means when it asks if the contractor inspected the structure before giving an estimate.
The route of the pipe is the third. An exterior run up the siding is the cheapest option. Running it inside through a closet, the garage and the attic hides it but adds labor, and the fan still has to sit somewhere that is not lived-in space.
And the fourth is power. The fan runs on a regular circuit. If there is no outlet near where it mounts, you are paying an electrician too. On older houses that sometimes opens a larger conversation, and upgrading an electrical panel has those numbers if it goes there.
Reading three radon quotes side by side
This is where the $1,150 to $2,900 spread made sense.
The $1,150 quote was a one-page estimate with a price and a phone number. It listed no diagnostic test, no warning device, no post-install test and no promise about the result. When I asked what happened if my level stayed high, he said it never does. He may even be right, but he would not write it down.
The $2,900 quote was thorough, and I liked the guy. It also routed the pipe through my upstairs hall closet and into the attic, and included sealing the entire basement floor. Good work, a lot of which my house did not need.
The $1,480 quote came from a contractor who showed me the state certification number unprompted, did a suction test on the slab before pricing, and put five things in writing: the design, the gauge, the fan warranty, a post-mitigation test, and a guarantee to get the house below 4 or come back and adjust it. That is almost exactly the checklist in the EPA guide, which asks whether the proposal includes proof of certification, liability insurance, diagnostic testing, a warning device, testing after installation, and a guarantee to reduce levels to 4 or below.
The EPA also makes a point I had not thought about. A cheaper system “may cost more to operate and maintain.” A weak fan on a poorly designed system can run for a decade and never quite get the number down. How I compare any trade quote is in how to tell if a contractor quote is fair, and the same rules apply here.
On certification: start with your state radon office. The EPA says many states require radon professionals to be licensed, certified or registered, and it points to two private credential programs, the National Radon Proficiency Program and the National Radon Safety Board, for lists of certified pros where the state does not keep one.
The radon work you can do yourself
Some of it, and a bit more than the installers tend to mention.
Testing is yours. A short-term kit runs about $15 to $40 with the lab fee, and the post-install test is the one I would not skip or leave to the installer alone. The EPA recommends an independent follow-up measurement, or doing it yourself, so nobody is grading their own homework.
Watching the gauge is yours. So is the retest every couple of years, and so is making sure nobody unplugs the fan to use the outlet for a shop vac. That happened at my house, in the first month, and the culprit was me.
What I tried and would not repeat: caulking every crack in the basement floor before anyone came out, on the theory that sealing the gaps would seal out the gas. The EPA is blunt about this one. It does not recommend sealing alone, because “by itself, sealing has not been shown to lower radon levels significantly or consistently,” and normal settling opens new cracks. Sealing makes a system work better, and that is all it does. I spent a Saturday and $38 in caulk learning that.
The install itself I left alone, and I would tell you to do the same unless you have taken the training. The EPA notes that doing it yourself can bring hazards and extra costs if it is done wrong, and it points DIYers to training courses through their state radon office. Drilling a slab is the easy part. Designing a system that actually pulls, venting it where the gas cannot come back in, and wiring the fan to code is where amateur jobs fail.
After the install: the retest, the fan and the bill
My installer finished in about five hours, and the first thing I did afterward was buy another test kit. The EPA says the post-mitigation test should happen within 30 days of installation, but no sooner than 24 hours after the system starts running with the fan on, and that a two to seven day test is recommended. Mine went from 5.9 to 0.9 on a kit I bought myself.
The fan runs all the time. The EPA’s instruction on this is in capital letters: the fan should NEVER be turned off. It also says fans may last five years or more, that manufacturer warranties tend not to go past five years, and that you should retest at least every two years. I budget $300 to $700 for a fan replacement somewhere around year six, installed.
Then there is the electric bill. A typical radon fan draws somewhere in the range of 40 to 90 watts, and it never stops. That is roughly 350 to 790 kilowatt-hours a year. At my utility rate of about 17 cents, that works out to $60 to $135 a year, or $5 to $11 a month. The EPA also notes most systems pull out a little heated or cooled air, which nudges the bill a little further. Mine sits at the low end, and I know because I watched the meter for a month.
Where the pipe ends up matters for more than looks. The EPA says the exhaust has to vent above the roof, at least 10 feet above the ground, and at least 10 feet from windows and doors unless it exits 2 feet above them. The fan cannot sit in or below lived-in space. If you are planning to finish that basement later, a system goes in more cheaply before the drywall does, and what finishing a basement costs is worth reading with that in mind. If the slab has a big crack that is moving rather than hairline, that belongs in foundation repair costs first, not in a radon quote.
Radon system installation cost by house type
The biggest thing that changes the price is what the house sits on. Here is how the jobs compare.
| House type | Usual method | 2026 estimate, installed | What moves the price |
|---|---|---|---|
| Basement, gravel under slab | Sub-slab suction, one point | $900 – $1,800 | Exterior vs interior pipe route |
| Basement with sump pit | Sealed sump lid as suction point | $900 – $1,800 | Lid quality, whether the pit drains properly |
| Slab on grade | Sub-slab suction, often from outside | $1,000 – $2,200 | Soil under the slab, number of points |
| Crawl space | Membrane plus suction under it | $1,500 – $3,500+ | Square footage, existing liner, piers |
| Mixed foundation | Two or more suction points | $2,000 – $4,000+ | One zone per foundation section |
What blows the radon mitigation budget
- Hiring off a single short-term test. One reading taken with windows open, or during a storm, can send you shopping for a system you do not need, or talk you out of one you do. The EPA bases its fix-it advice on a long-term test or two short-term tests averaged.
- Taking the one-page quote. No diagnostic test, no warning device, no post-install test and no written guarantee is how a $1,150 system turns into a second visit and a second bill. The cheaper system can also cost more to run, which the EPA points out in plain words.
- Installing after the basement is finished. Running pipe through new drywall, a finished ceiling or an upstairs closet is where the interior-route premium comes from. If a finished basement is in your plans, test and mitigate first.
Frequently Asked Questions
How much does a radon mitigation system cost?
Most houses land between about $900 and $2,500 installed in 2026, with a basement or slab house and one suction point near the low end. Crawl spaces, homes with more than one foundation type, and interior pipe routes can reach $3,500 or more. These are estimates that shift with region, soil and labor rates. The EPA publishes no national figure and recommends getting estimates from one or more qualified mitigation contractors.
At what radon level do I need a mitigation system?
The EPA recommends fixing your home if a confirmed test shows 4 pCi/L or higher, meaning one long-term test or the average of two short-term tests. It also says levels below 4 still carry some risk and that you may want to consider fixing between 2 and 4. Test with the house closed up for 12 hours before and during a short-term test, or the result can read far too low.
How much does it cost to run a radon fan?
A typical radon fan draws roughly 40 to 90 watts and runs around the clock, which comes to about 350 to 790 kilowatt-hours a year. At 17 cents per kilowatt-hour that is roughly $60 to $135 a year, plus a small loss of heated or cooled air. The fan should never be switched off, and the EPA says fans may last five years or more before needing repair or replacement.
If you are working through the rest of the house too, my home renovation cost guide has the full picture, and how I would hire a basement contractor covers the vetting questions I used here.
All prices here are 2026 estimates and vary by region, foundation type, soil, house size, permits and local labor rates. Tessa is a hands-on homeowner who has hired this work and read the quotes, not a certified radon measurement or mitigation professional. Nothing here is a diagnosis of your house or medical advice. Radon levels can only be known by testing, and the EPA recommends a state certified or qualified radon mitigation contractor for the installation. Use these ranges to ask sharper questions of the people bidding on your house, not as a quote.
Free DIY Project Cost Estimator
The spreadsheet I use to price out a project before I start, so a weekend job never blows the budget. Join the newsletter and I’ll send it over.
No spam, ever. Unsubscribe anytime. — Tessa
Keep reading — more on Remodel & Renovation Costs
Boiler Replacement Cost: Gas, Oil, and Combi Boilers Compared
My friend Marisol called me on a Sunday in October with her coat on inside the…
Read article →
HVAC System Replacement Cost: Furnace, AC, or Both at Once
The tech who told me my air conditioner was done also handed me a second price…
Read article →
Furnace Tune Up Cost: What a Fall Service Includes (and What to Skip)
Three companies left door hangers on my porch the same week in September. One said $79.…
Read article →
Furnace Blower Motor Replacement Cost in 2026: PSC vs ECM
My dad called on a Sunday in January and opened with “the furnace is running but…
Read article →